
Splitting PDF Invoices Into Multiple Folders
AutoSplit Pro plug-in for Adobe® Acrobat®
- Introduction
- It is very common problem to split a PDF document that contains multiple invoices or statements. The AutoSplit™ Pro software can split a PDF documents that contain variable-length invoices, account statements, reports into separate PDF files. The following tutorial is going to show how to take a PDF file with multiple invoices and split it into multiple output folders based on invoice "billing type". Each output PDF file will contain only a single invoice.
-
- Input Document Description
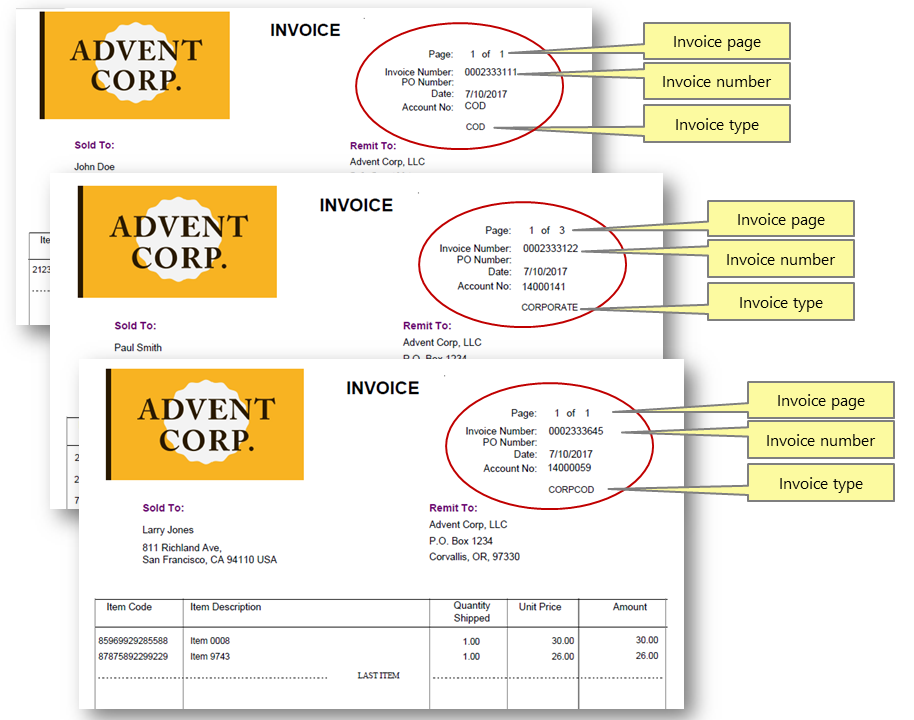
- The input PDF document contains multiple invoices of variable length. The goal is to split it into multiple documents that contain each invoice as a separate file and name it, using a text from the first page of each document, using invoice numbers for file names. Each invoice should be saved into proper sub-folder according to its "billing type". Each invoice has one of the 3 different labels - COD, CORPCOD and CORPORATE. Splitted invoices should be placed into a proper sub-folder (COD, CORPCOD and CORPORATE) according to these keywords.
- Splitting Approach
- It is common that each invoice has its separate page numbering, typically in a form of "Page N of M" text pattern. The easiest method to split such documents is to use "Page 1 of " or “1 of ” text as a "separator". Since this text always occurs on the first page of each invoice, it is natural to use it as a reliable separator. Using “Page 1 of” is the very common approach for splitting invoices or statements.
- Prerequisites
- You need a copy of Adobe Acrobat Standard or Professional along with AutoSplit Pro plug-in installed on your computer in order to use this tutorial. You can download trial versions of both Adobe Acrobat and AutoSplit Pro.
Step-by-Step Tutorial
- Step 1 - Open a PDF File
- Start Adobe® Acrobat® application and open a PDF file using “File > Open…” menu to open a PDF document that needs to be processed.
- Step 2 - Open “Split Document Settings” Menu
- Select “Plug-ins > Split Document…” from the main Acrobat® menu to open “Split Document Settings” dialog.
[⚡ How to locate Plugins menu ⚡]. - Step 3 - Select Splitting Method
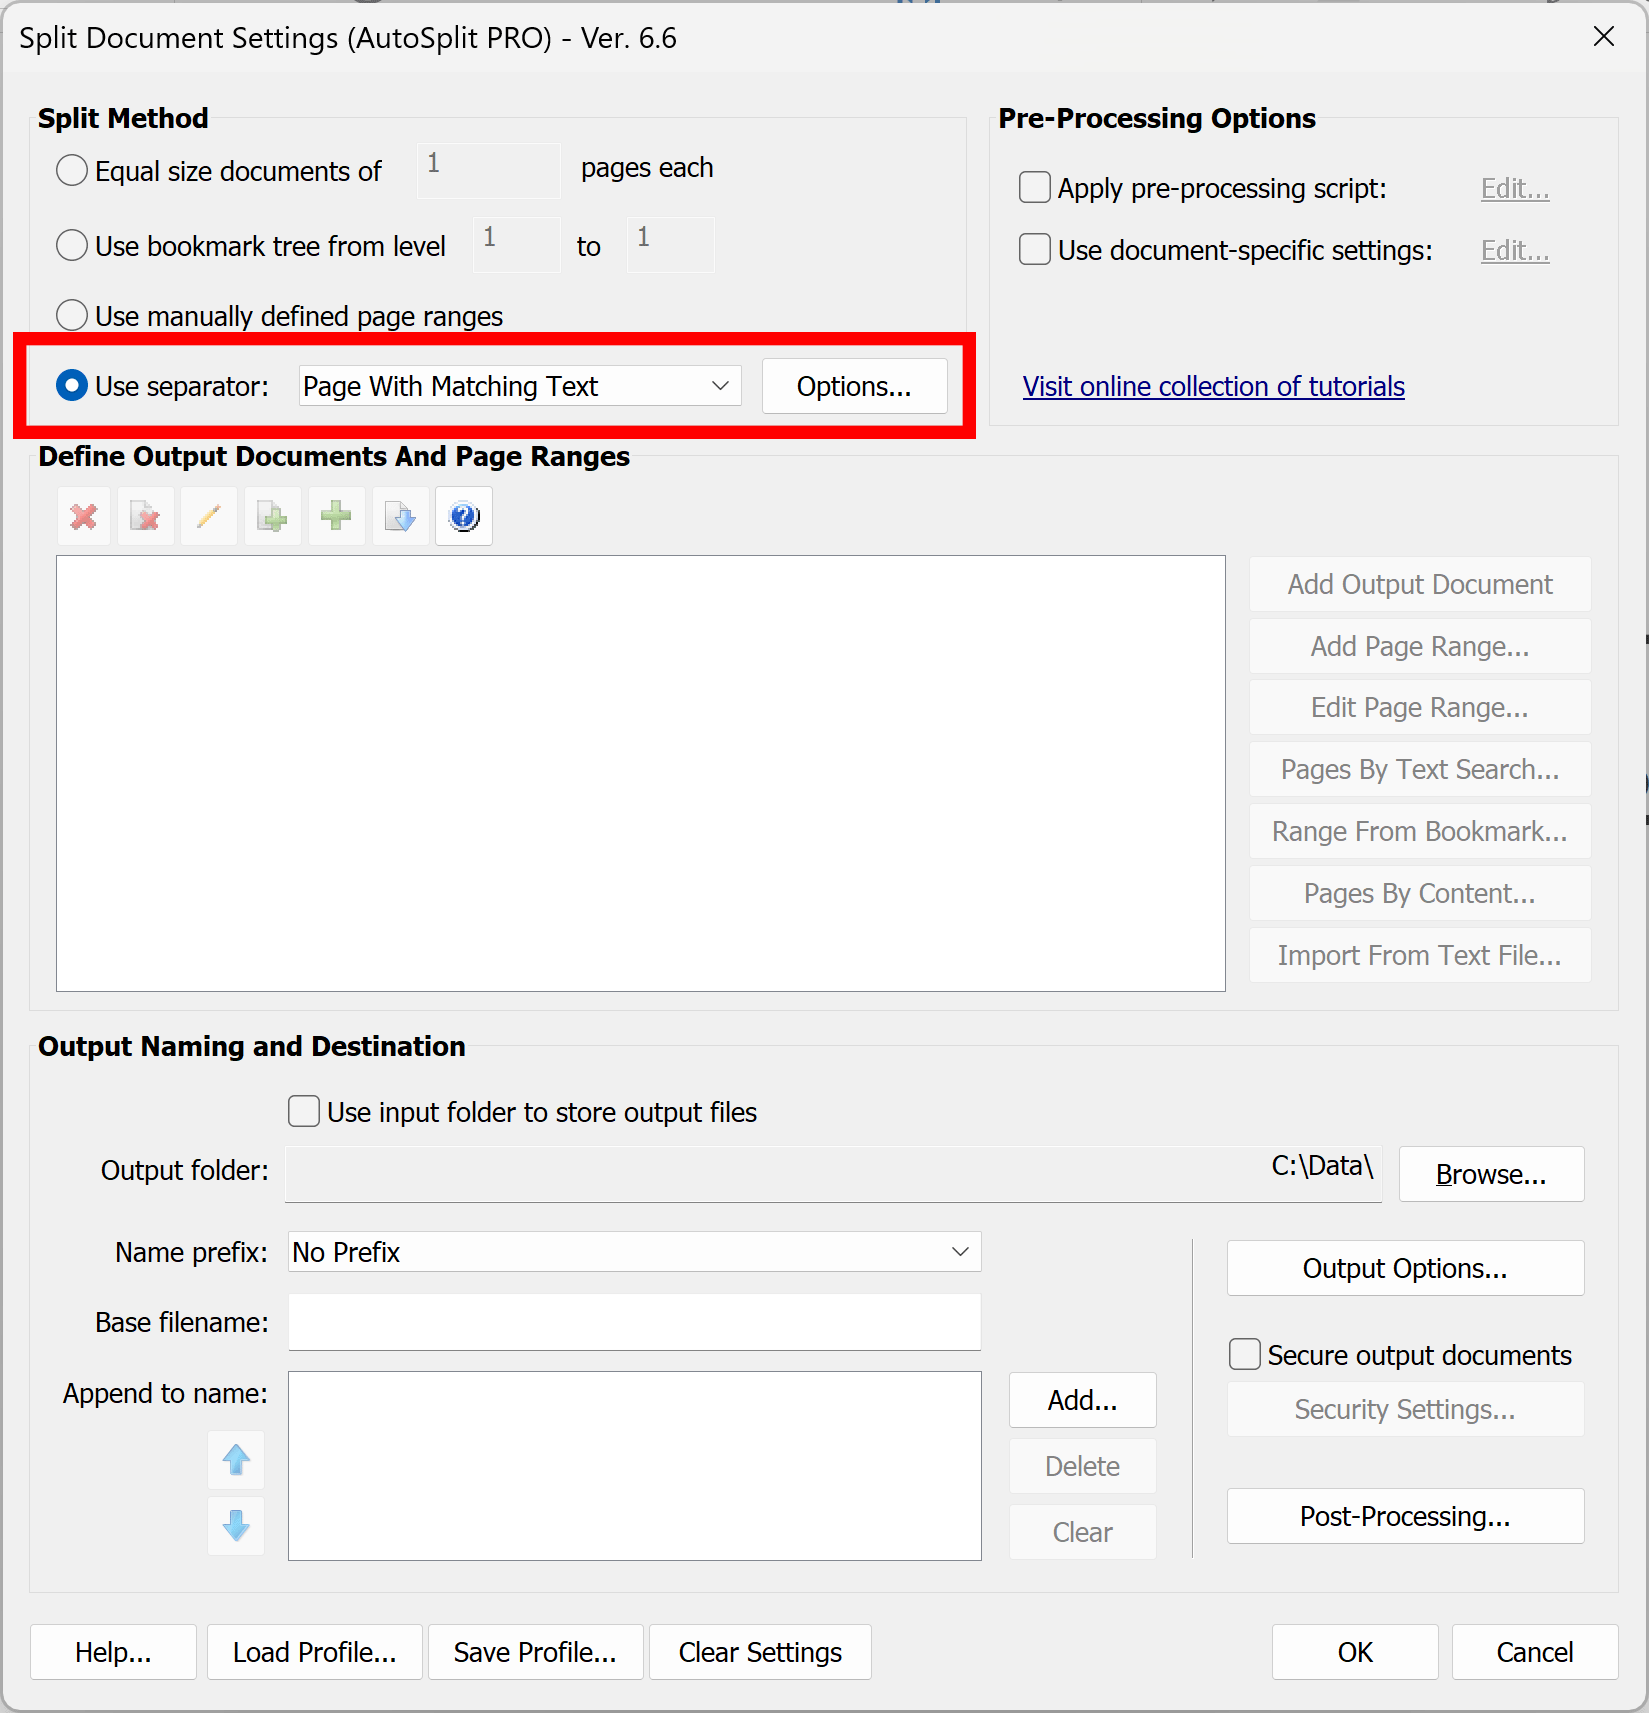
- Check “Use separator” box, select “Page With Matching Text” from the list of available options. Next, press “Options…” button.
-
- Step 4 - Configure Splitting Parameters
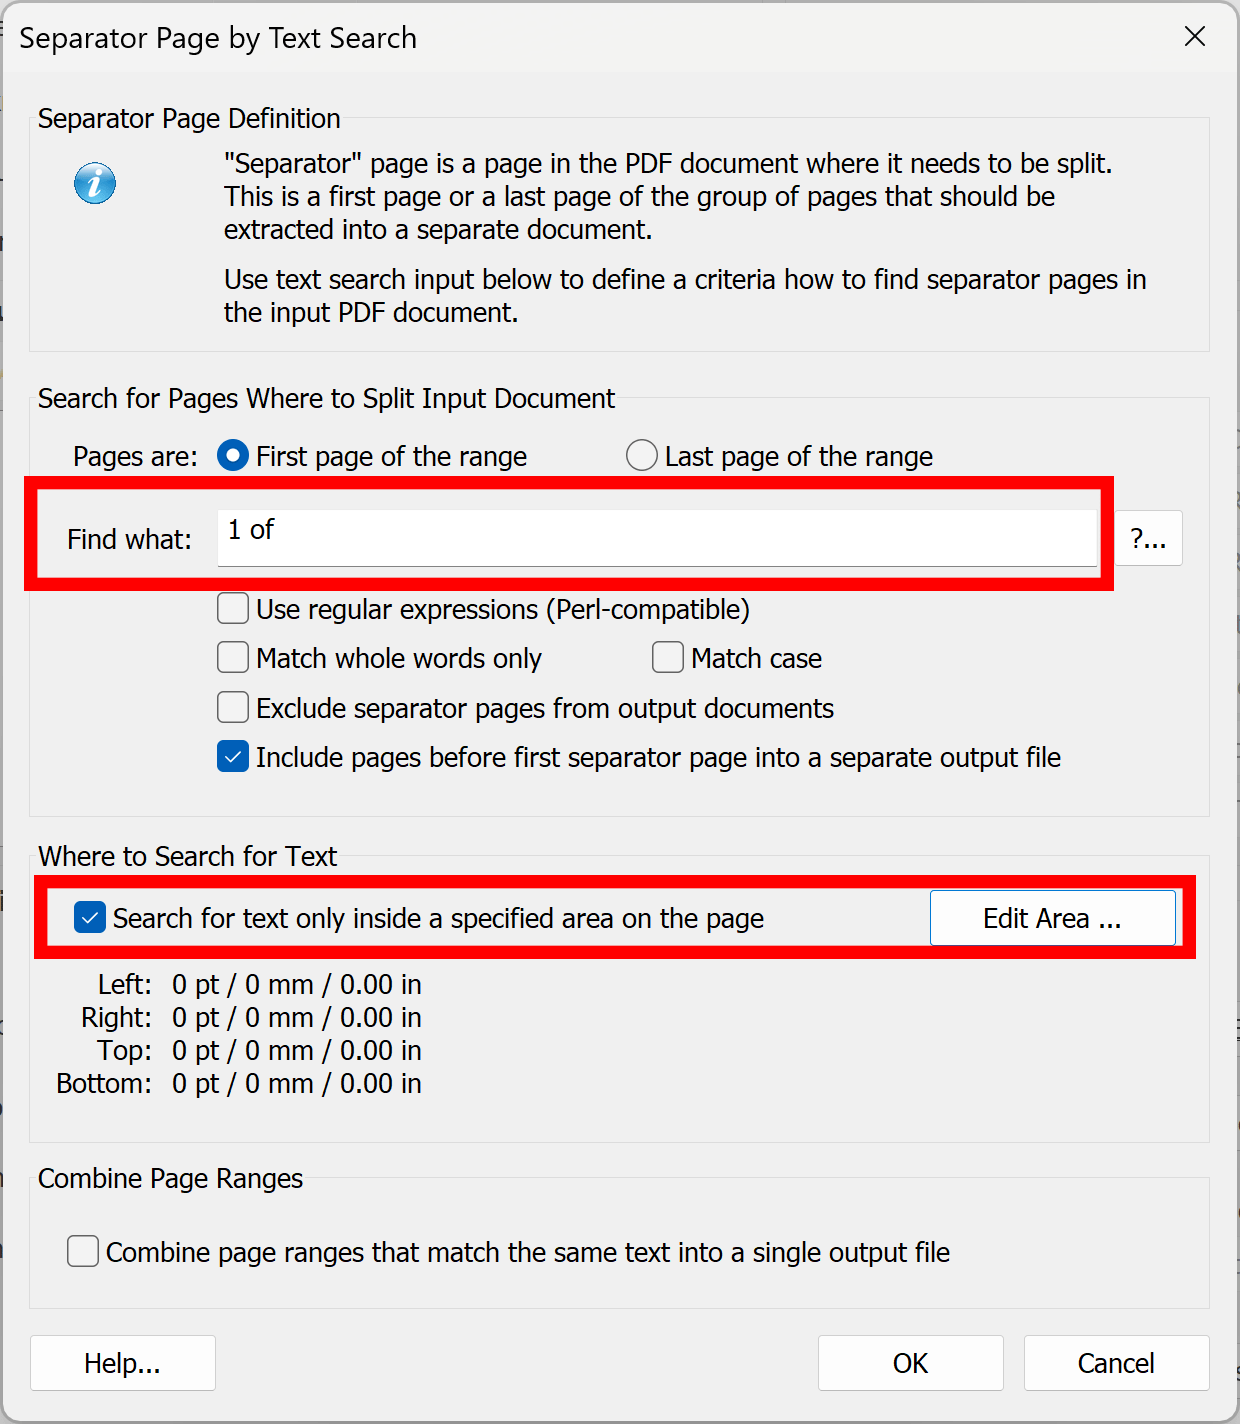
- Enter “1 of” into “Find what” box. The document will be split at pages that contain “1 of …” text. This is common way to detect a first page of each invoice since it often contains "Page 1 of X" labels. Check “Search for text only inside a specified area on the page” box to limit text search to a specific page area.
- Press “Edit Area…” button to define a page area where to look for the text.
-
- Step 5 - Define Text Location On the Page
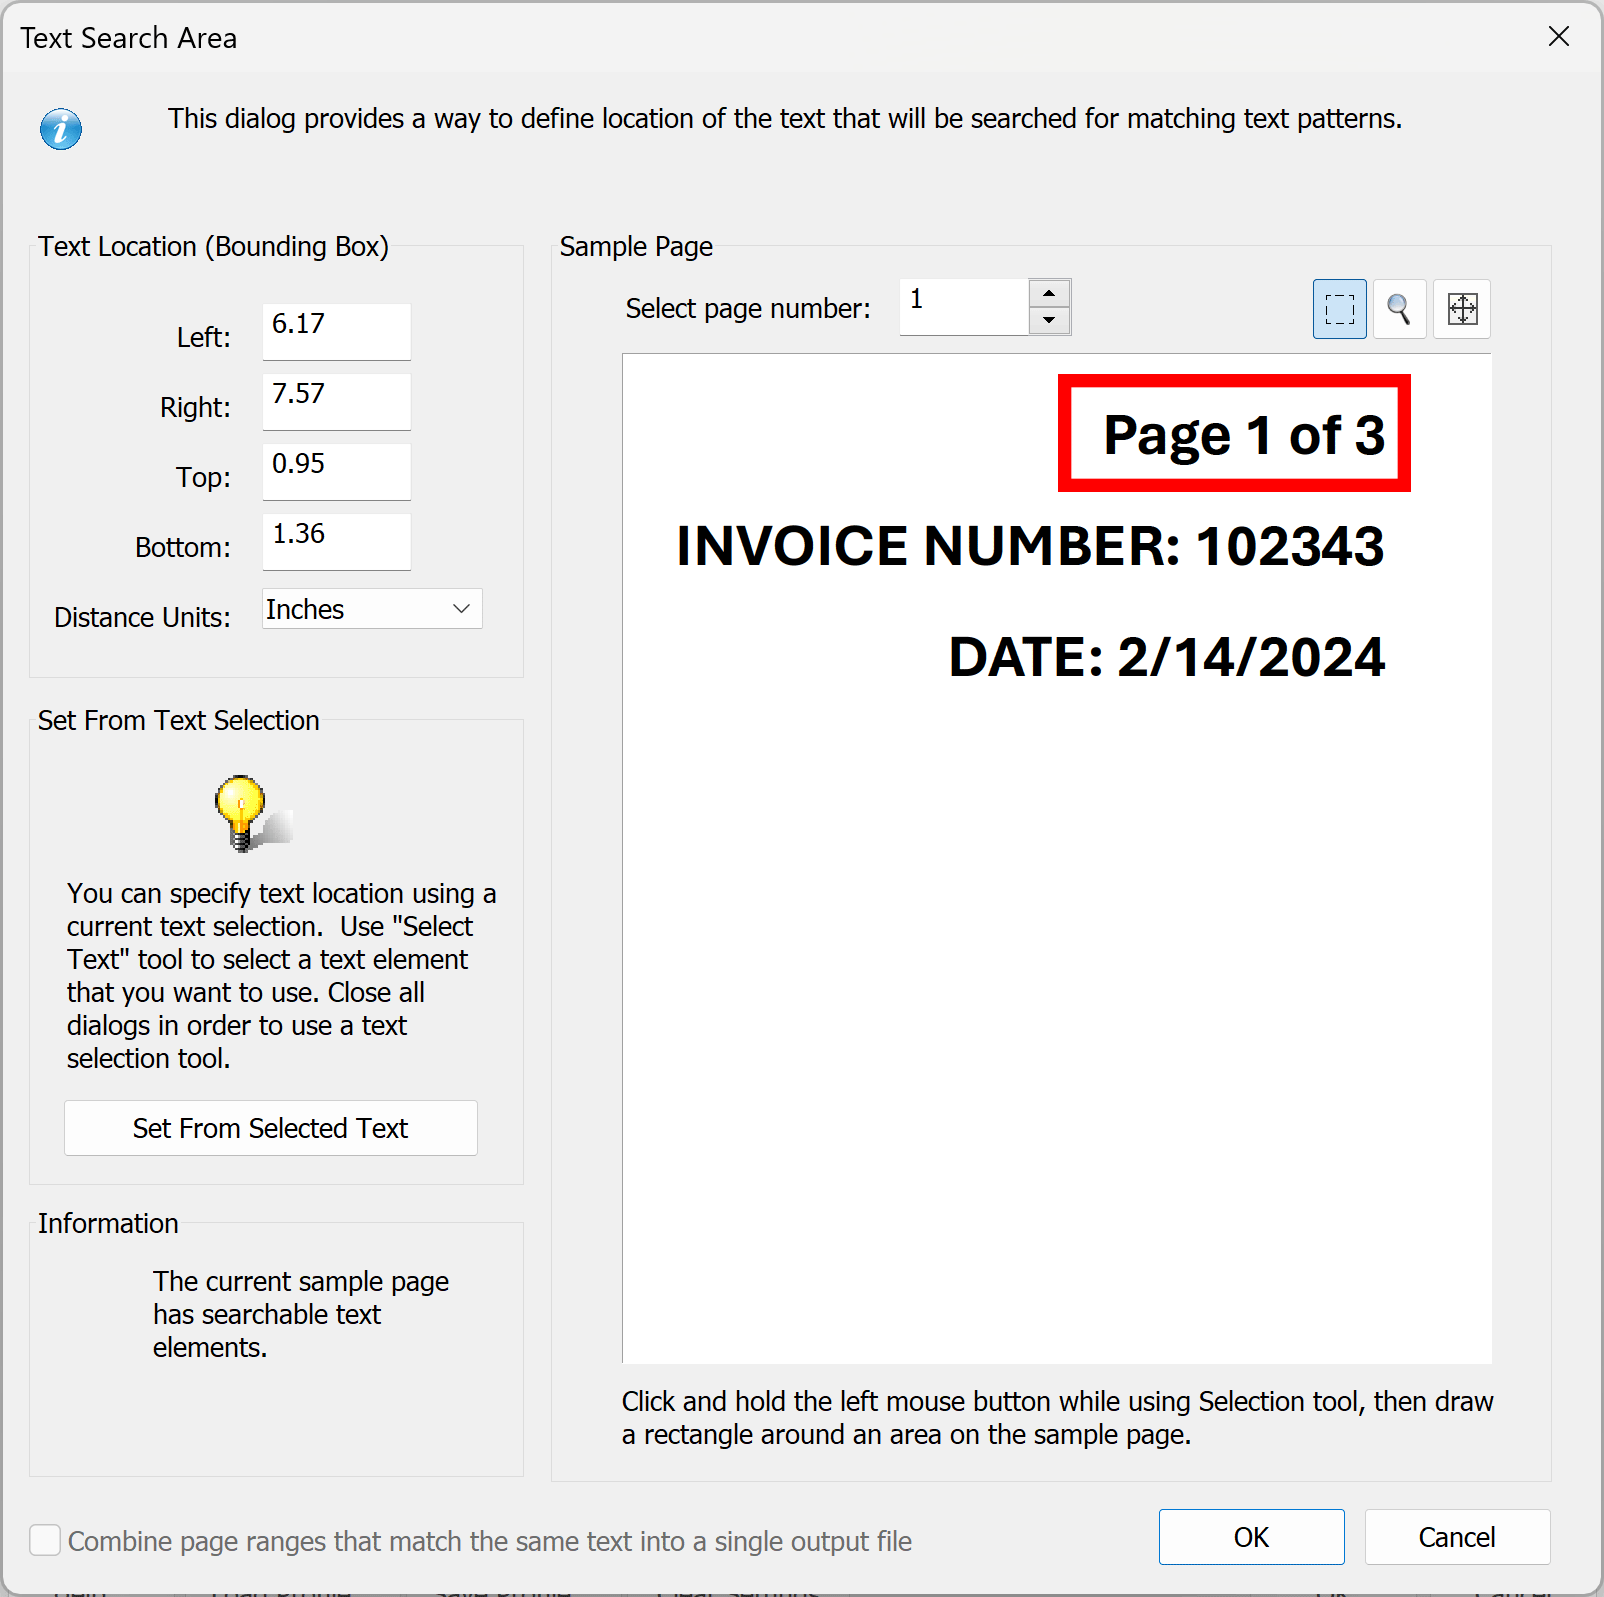
- Define page area where separator text (1 of ...) is located by drawing a box around it. Try to select an area that does not include any other text. Use "Zoom" tool to enlarge part of the page for a more precise selection.
- Click “OK” once done.
-
- Step 6 - Confirm Split Method Settings
- Press “OK” button in the “Separator Page by Text Search” dialog to save settings.
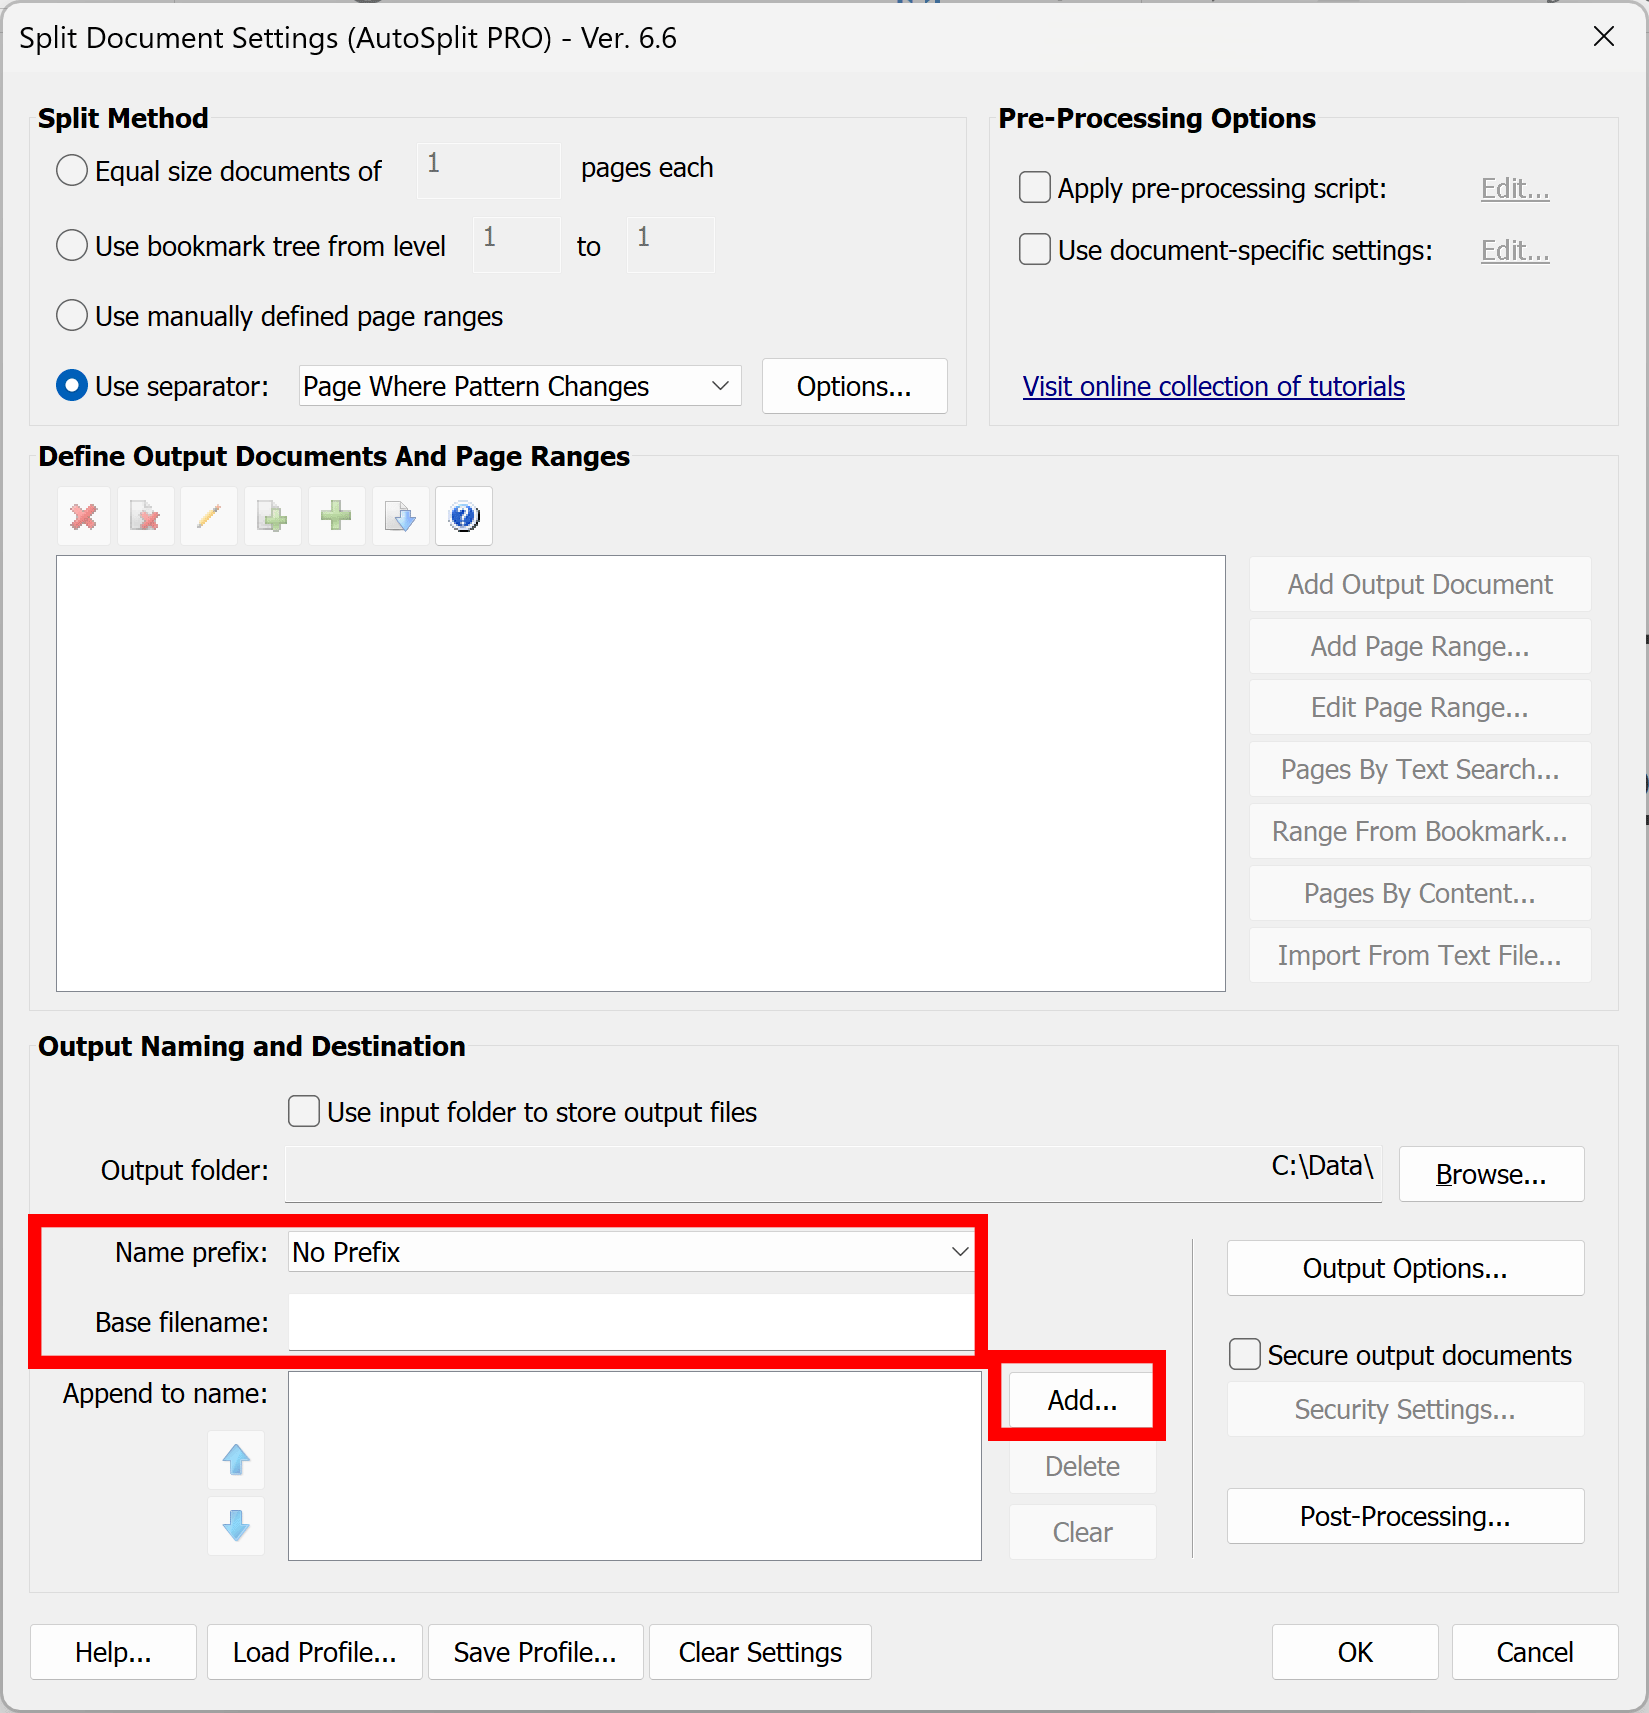
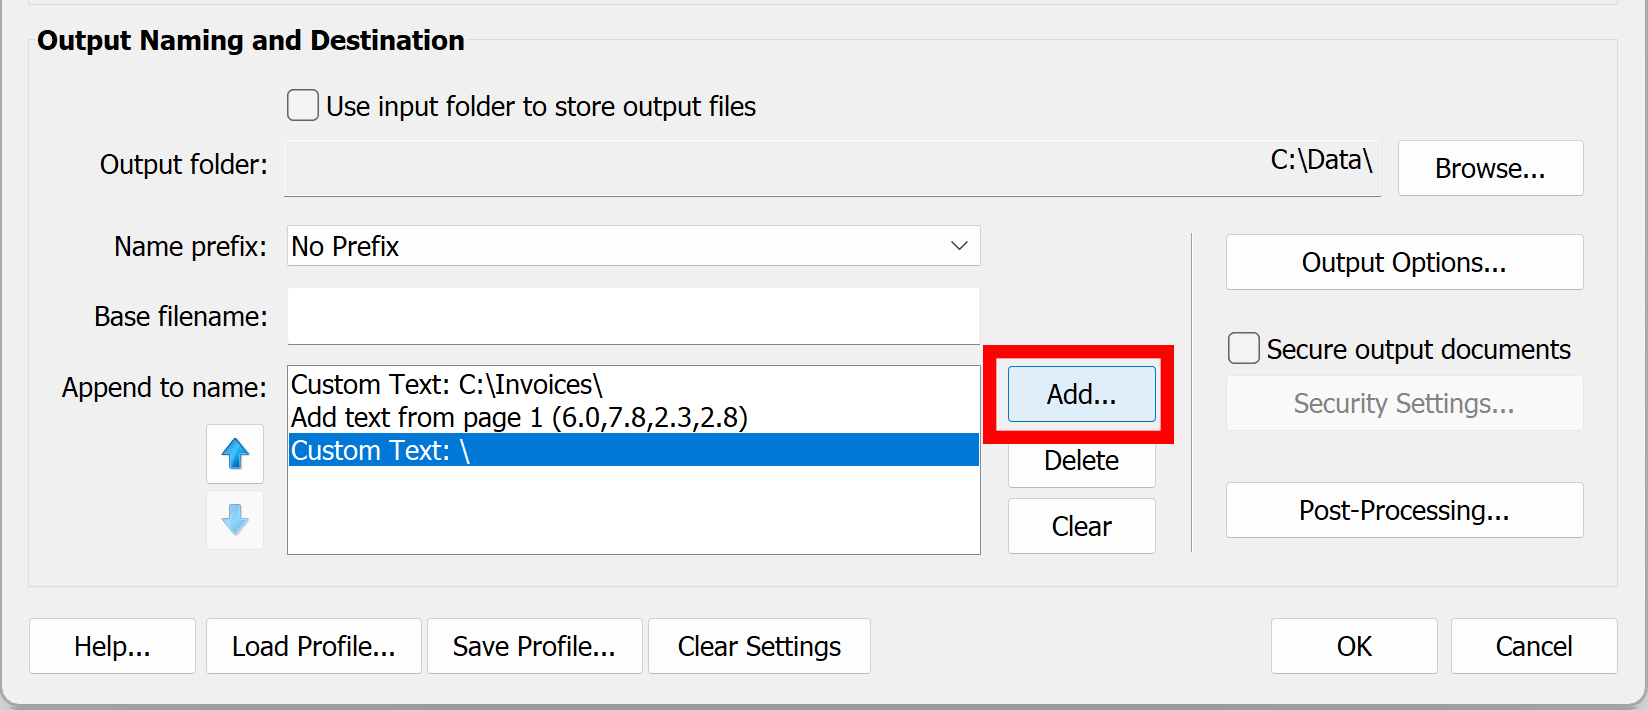
- Step 7 - Specify Output File Naming
- Set "Name prefix:" to "No Prefix" option. Make sure "Base filename" box is empty and there are no any entries in "Append to name:" list.
- Press “Add…” to start defining an output naming scheme.
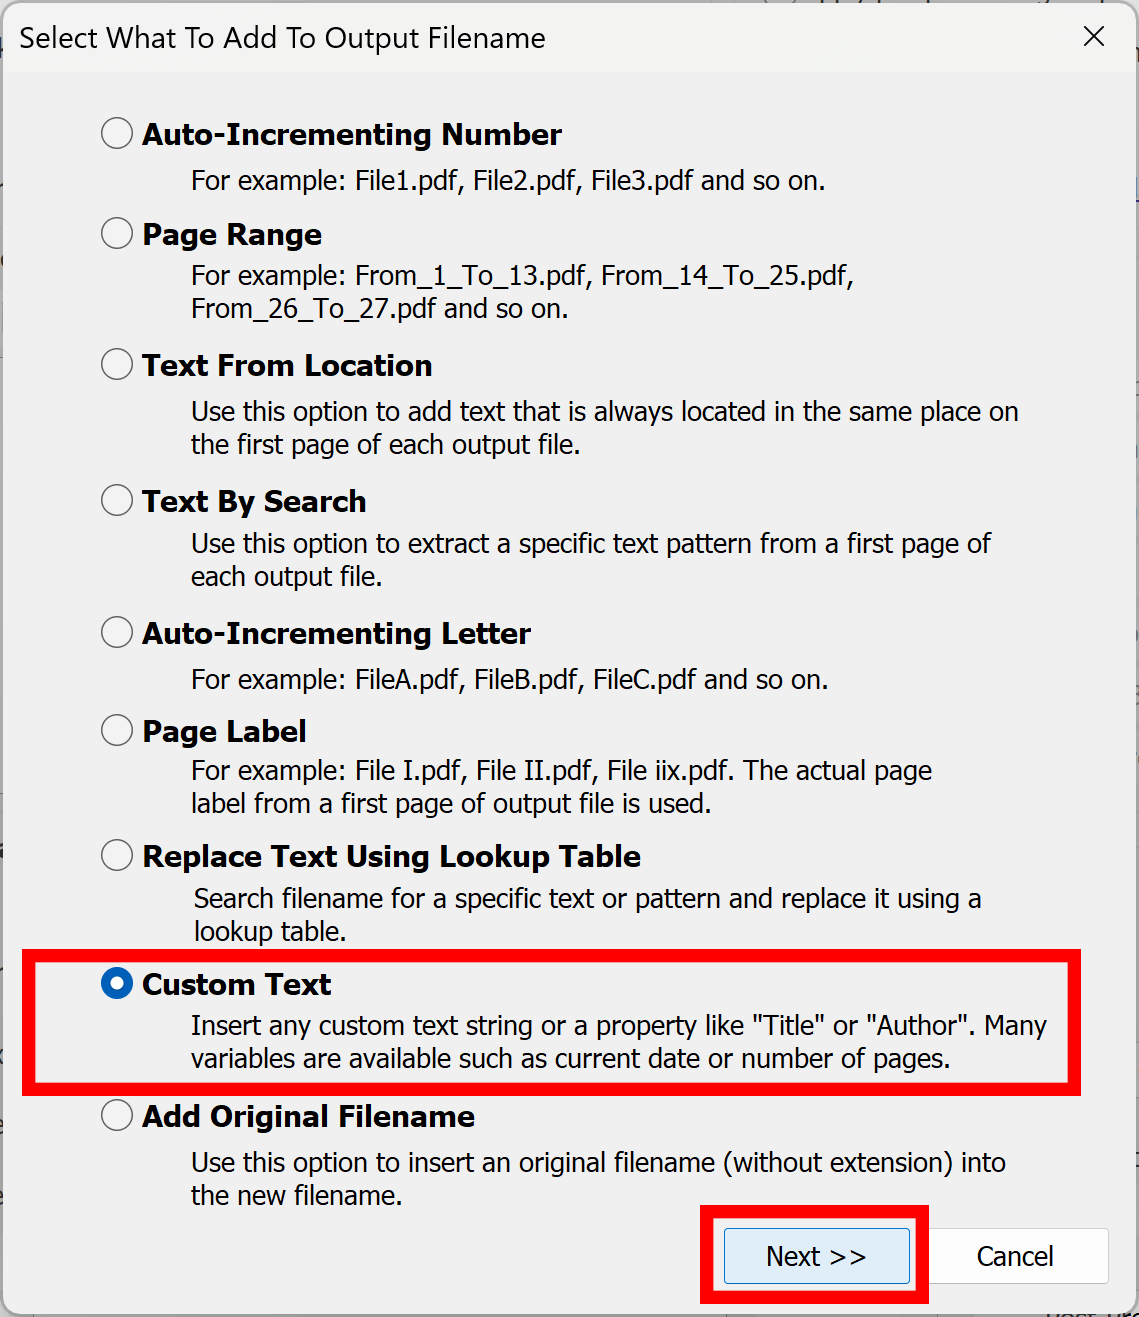
- Step 8 - Start Defining an Output Naming Scheme
- Now your actions depend on where exactly you want to extract files from the input document. The goal is to separate output documents into multiple sub-folders based on text present on the first page of each document. The output file path will be constructed entirely based on the document content. This method allows to "sort" output files by "billing type" into different folders.
- Press “Add…” to start defining an output naming scheme.
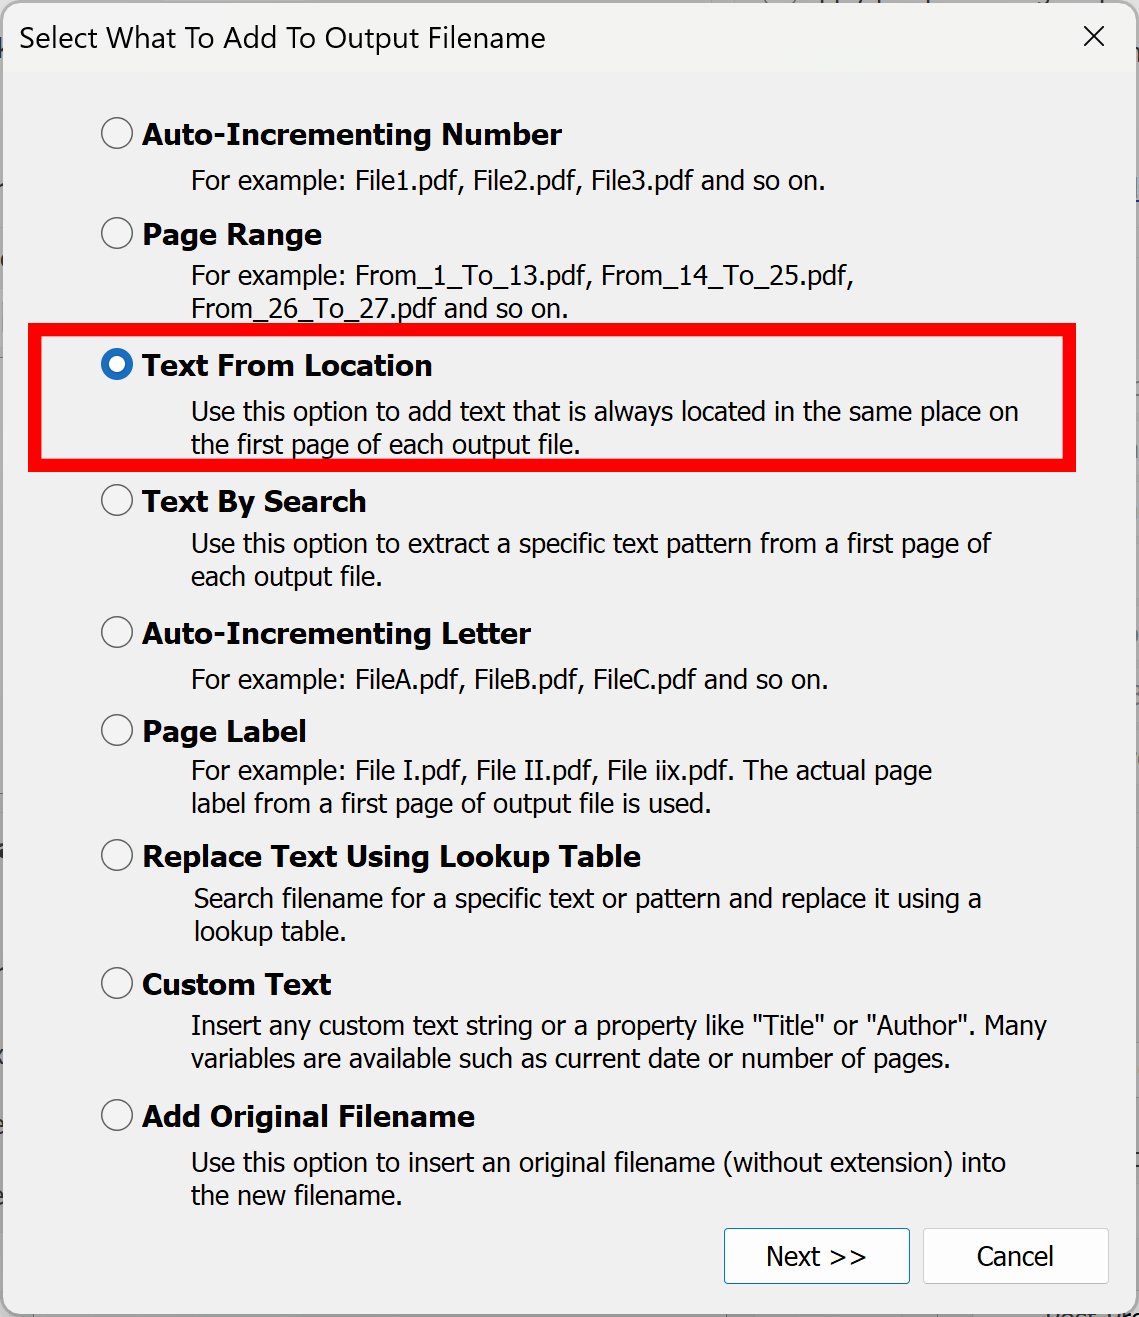
- Select “Custom Text”, and click “Next”.
-
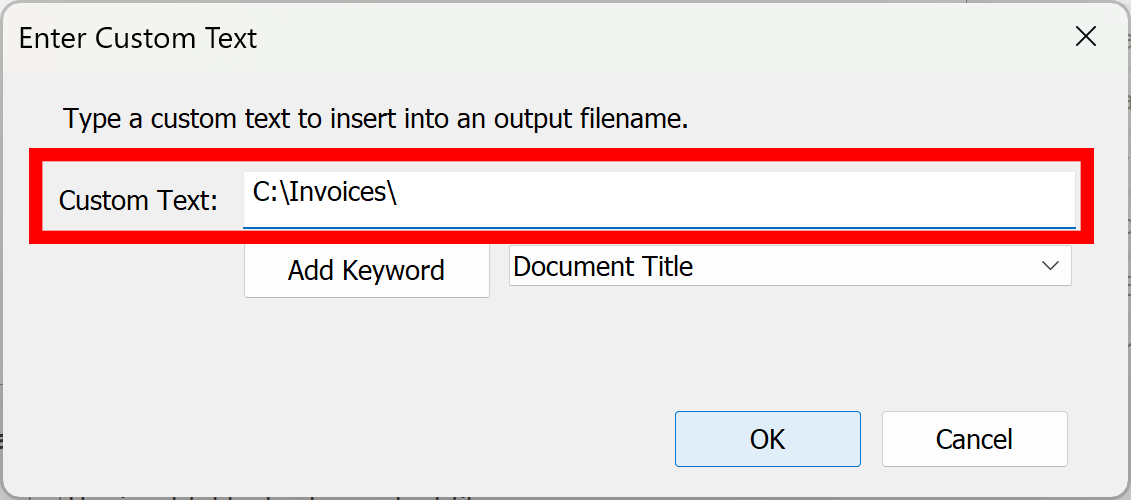
- Step 9 - Type an Output Folder Path
- Type C:\Invoices\ into Custom Text: entry box. This is going to be a root folder where all other sub-folders will be placed. You can type any other output folder path according to your project requirements. Make sure it ends with “\”. Click “OK” button.
-
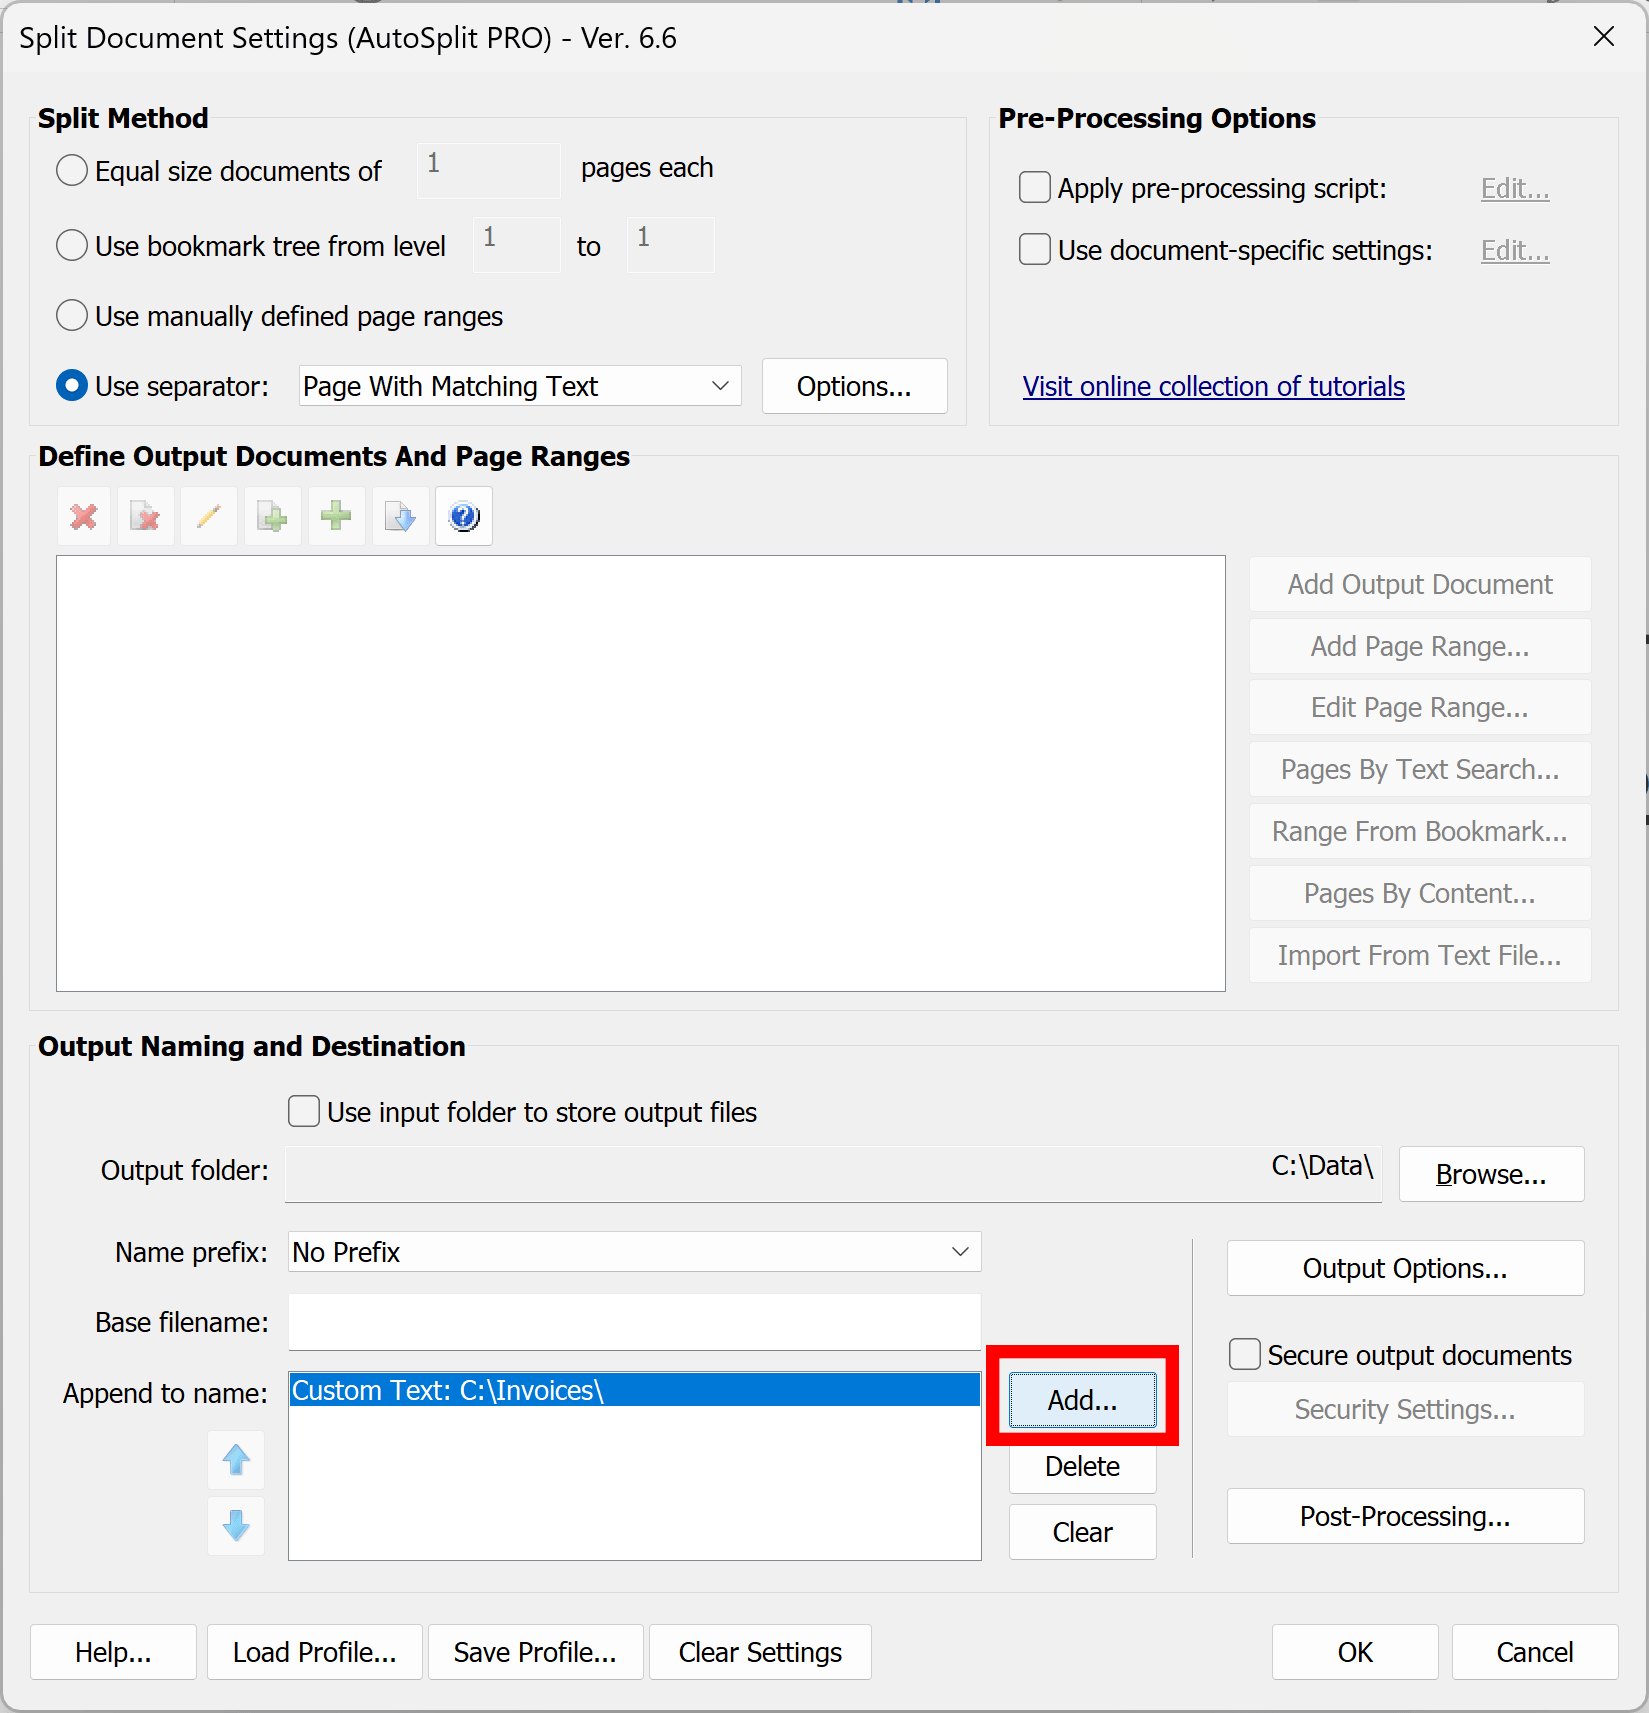
- Step 11 - Define a Naming Scheme for Sub-Folders
- Now you should see a new entry in the "Append to name:" list. Press “Add…” button one more time.
-
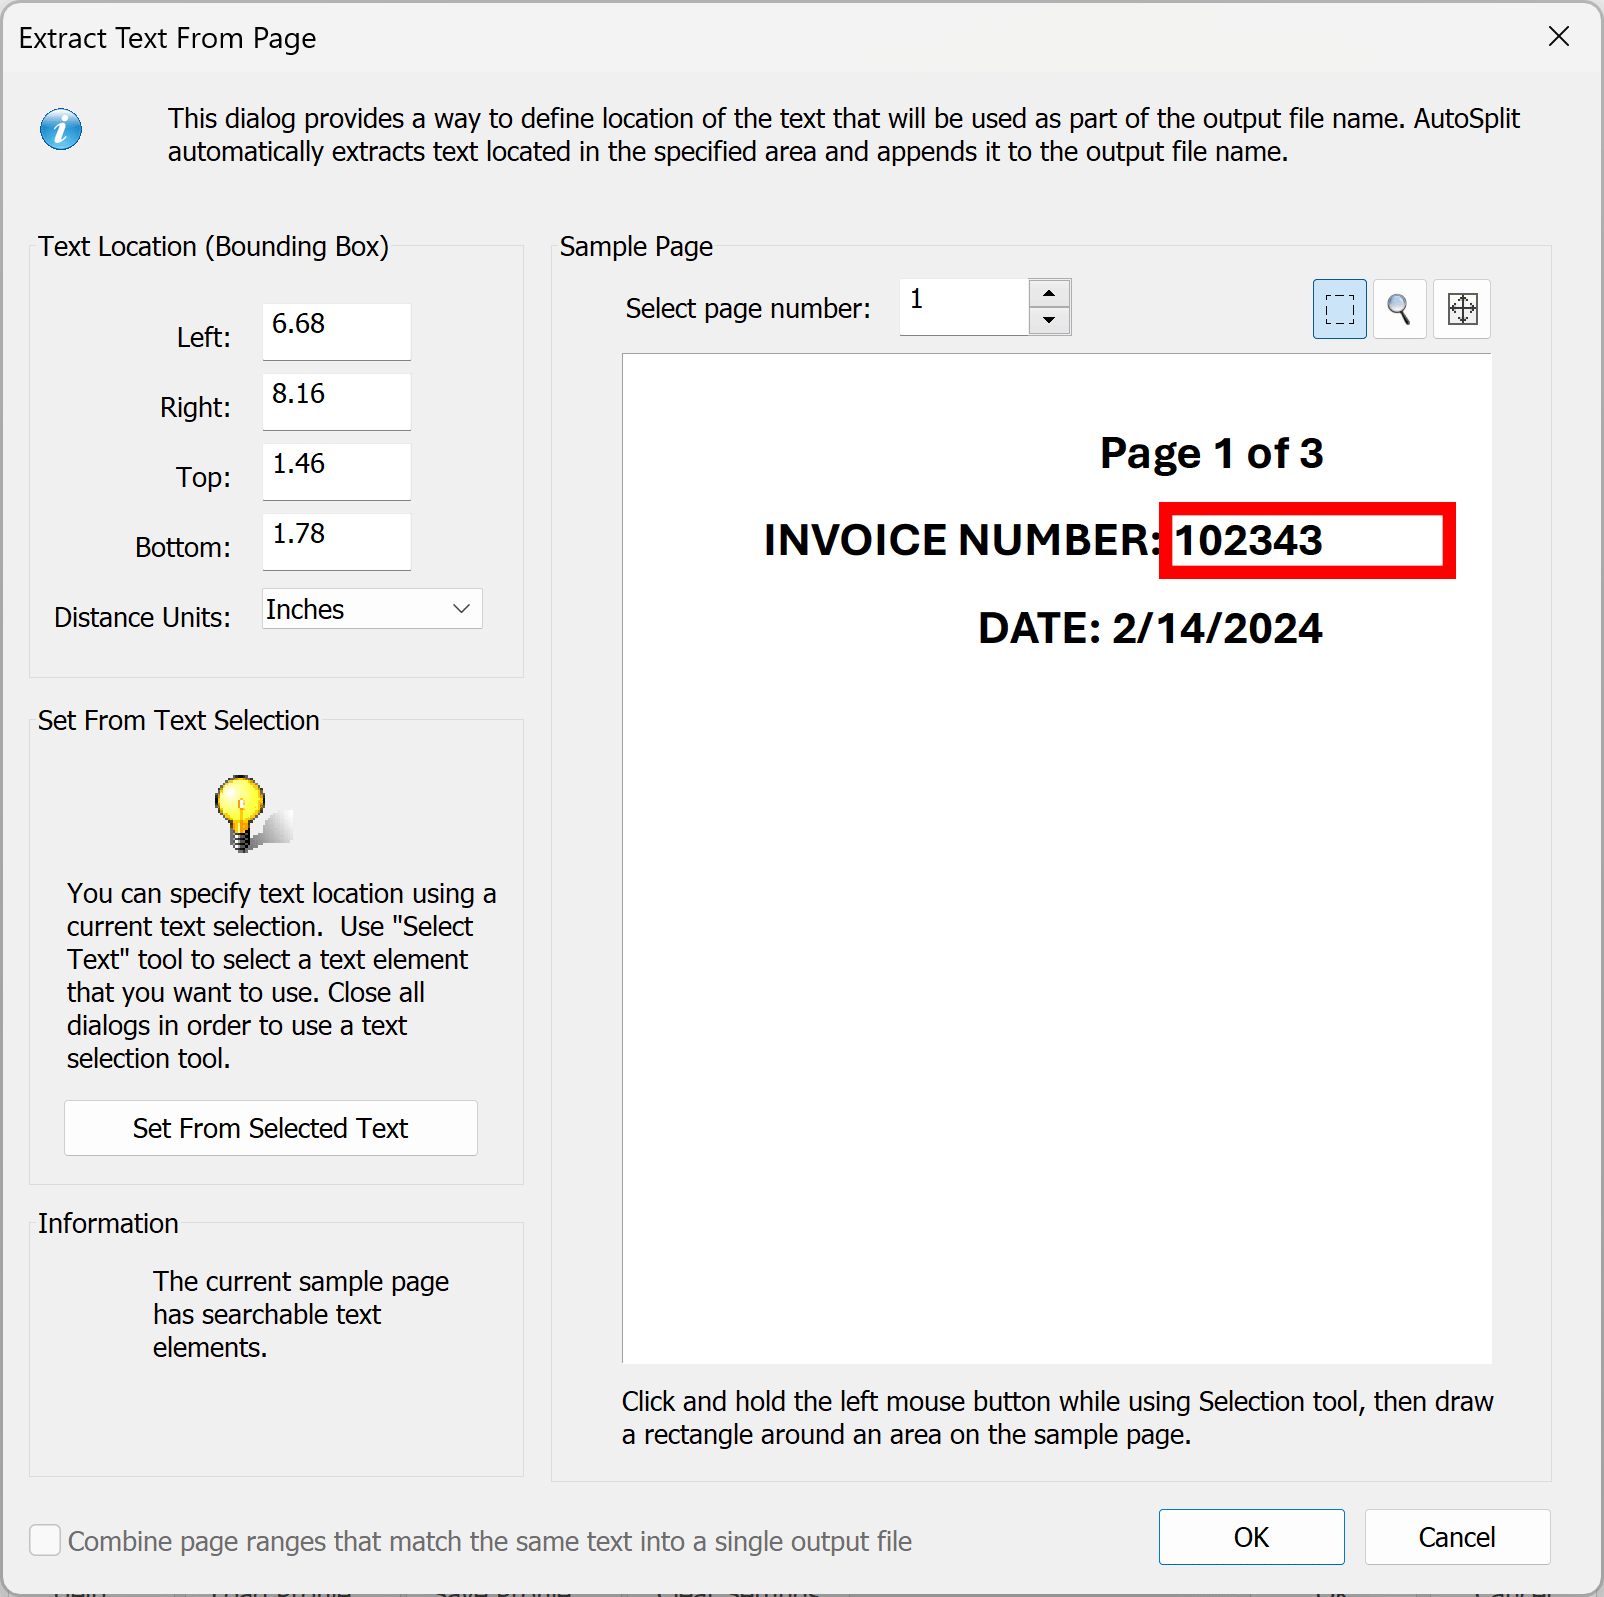
- Step 12 - Select Text From Location Option
- Now your actions will depend on how exactly you want to extract text from the document for the output sub-folder. The tutorial assumes that text is going to be extracted from a fixed location on the first page of each output document.
- Select "Text From Location" option and press "Next" button to advance to the next screen.
-
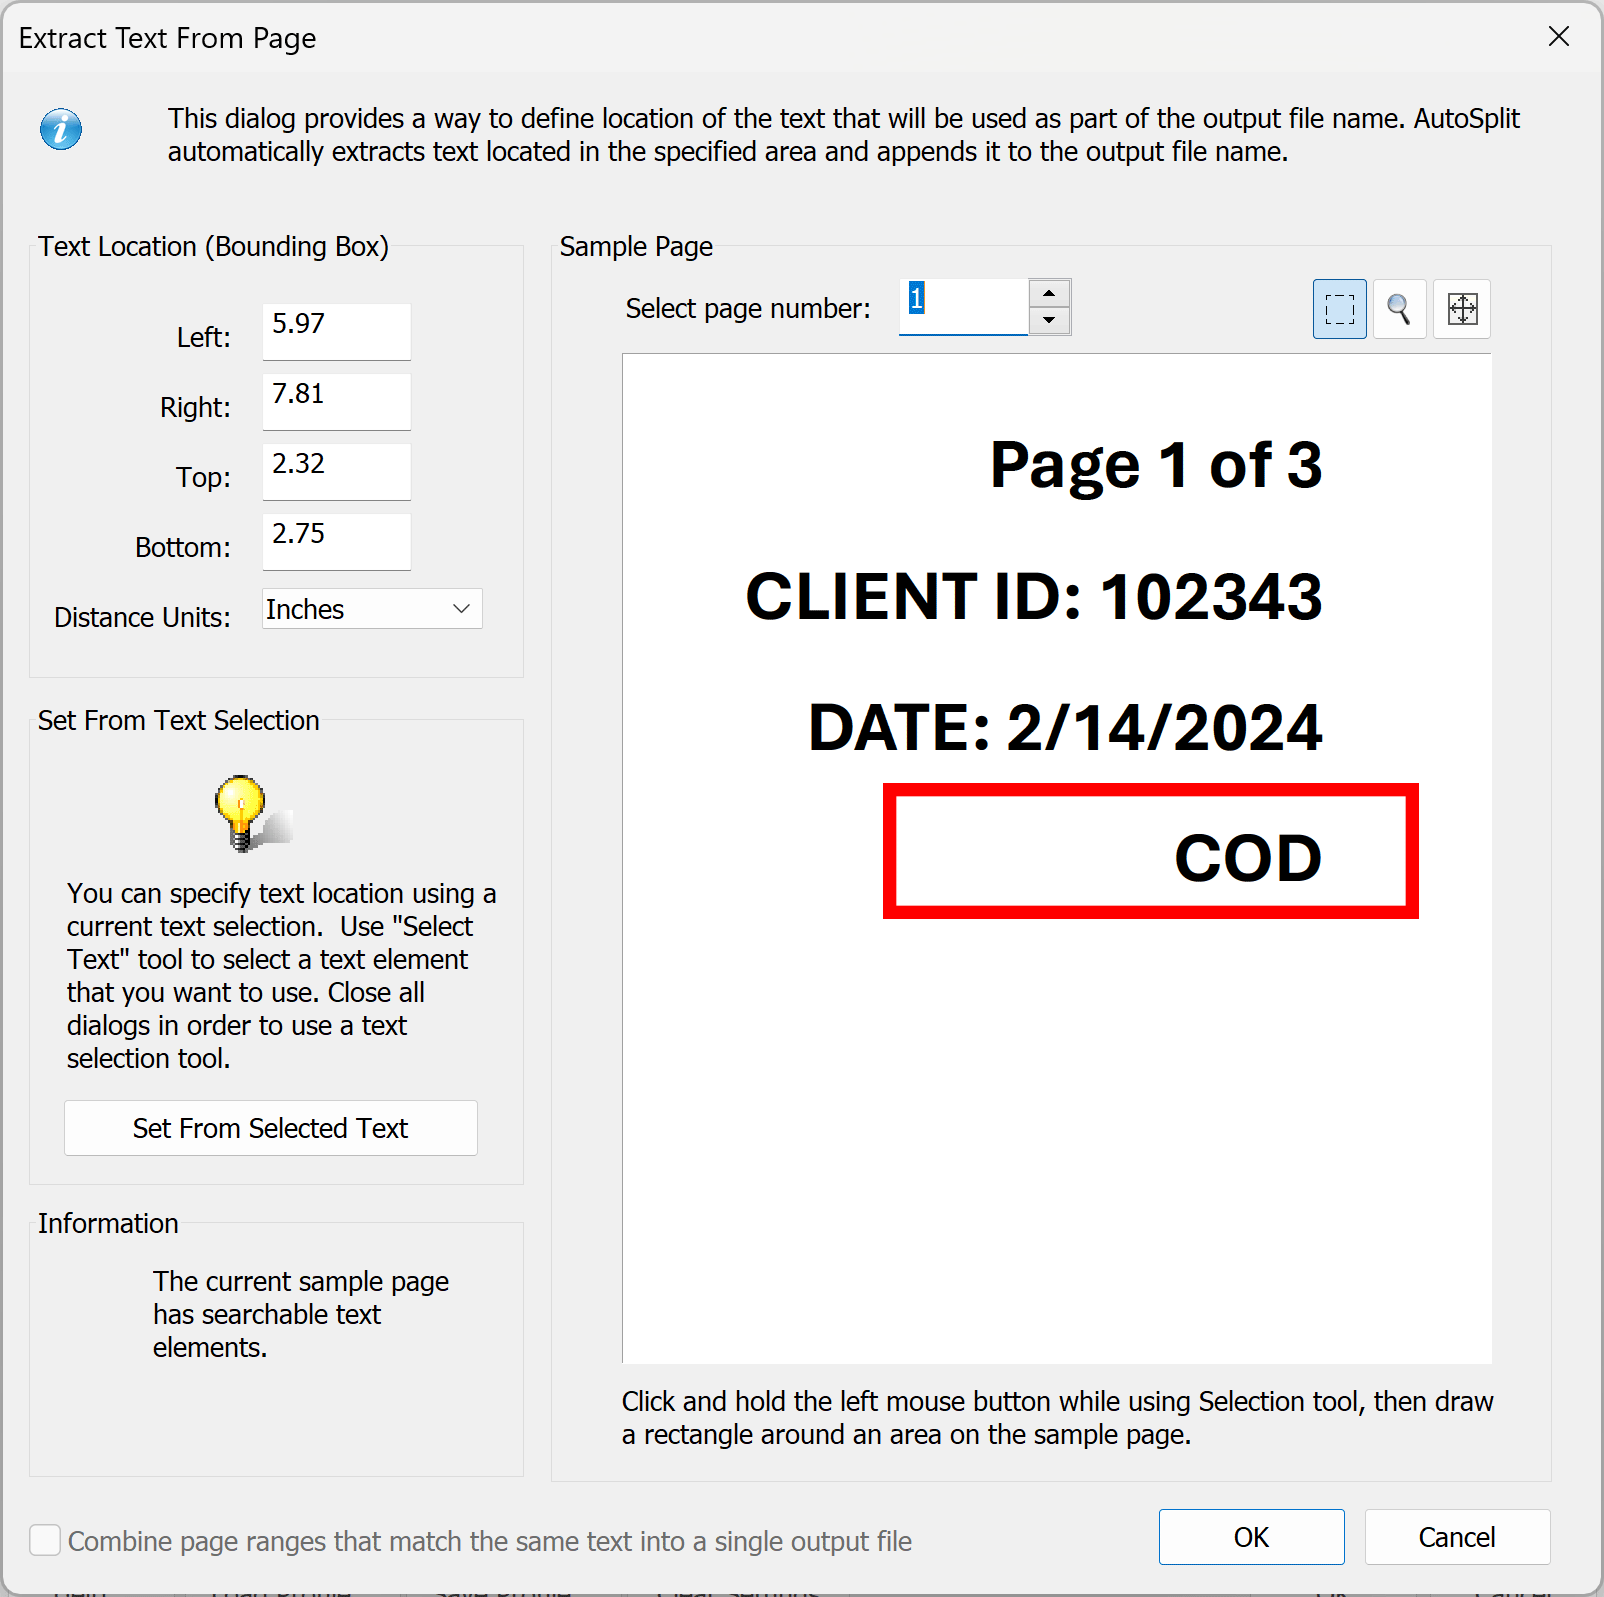
- Step 13 - Define Page Area Where To Extract Text
- Position mouse at the page area, where you want to extract text for the sub-folder name and press and hold left mouse button.
- Draw a box around the area, where invoice type is located, and release mouse button. Now you have defined an area for the text extraction. If you made a mistake simply do it again.
- Press “OK” button once done.
-
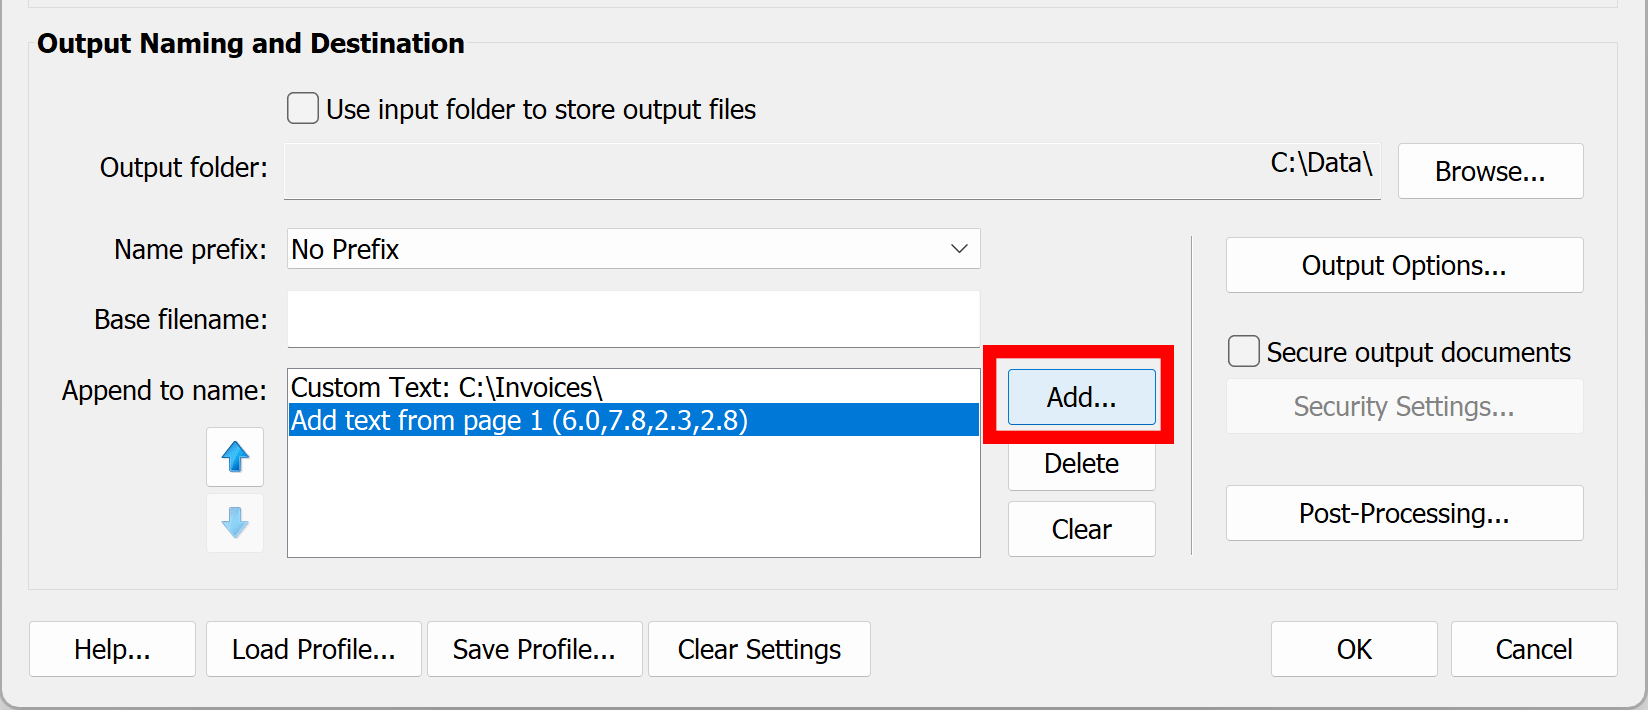
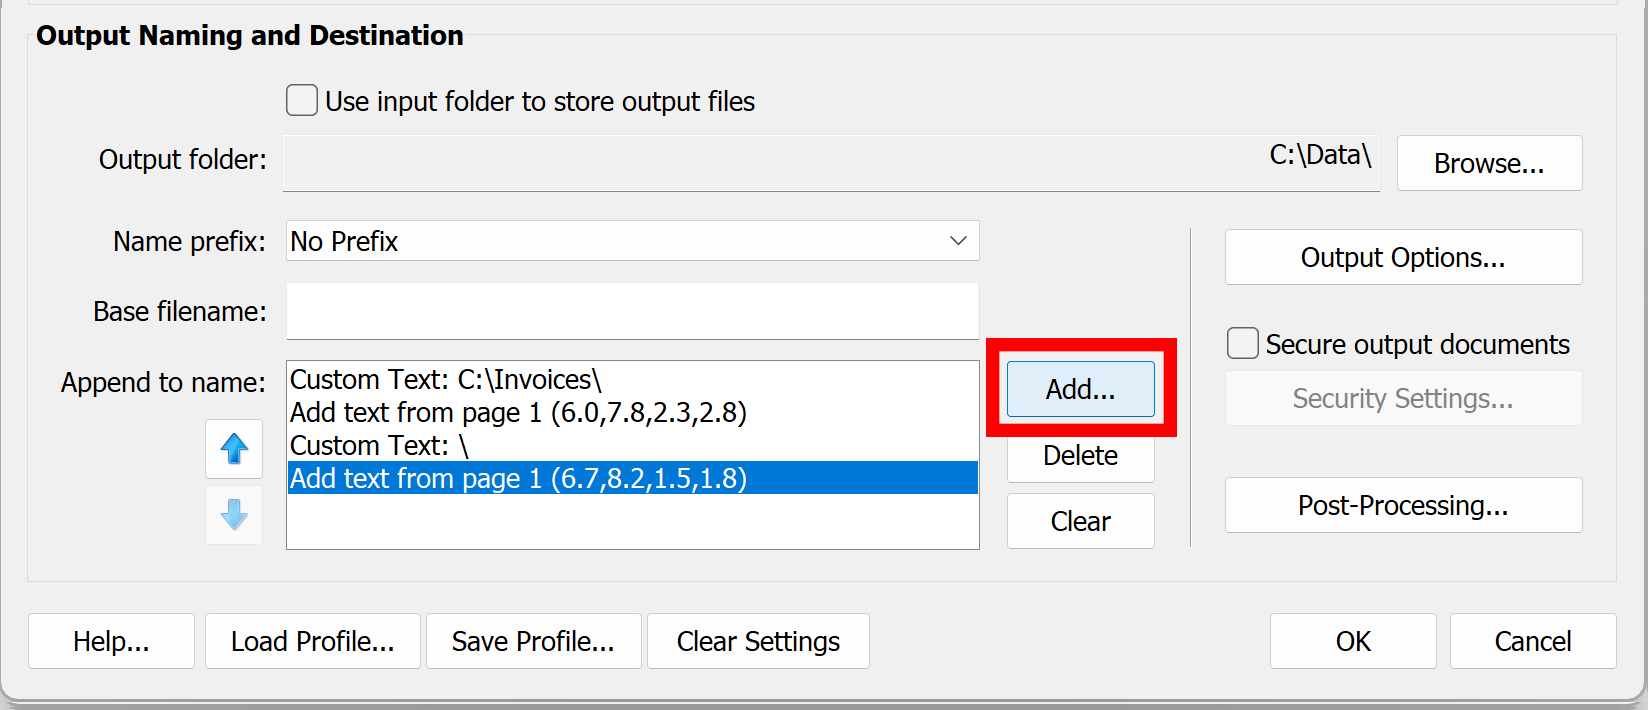
- Step 14 - Add Backslash After Folder Name
- Now you should see a second entry in the "Append to name:" list. Press "Add..." button again to add a backslash character after a folder name.
-
- Step 15 - Select Custom Text Option
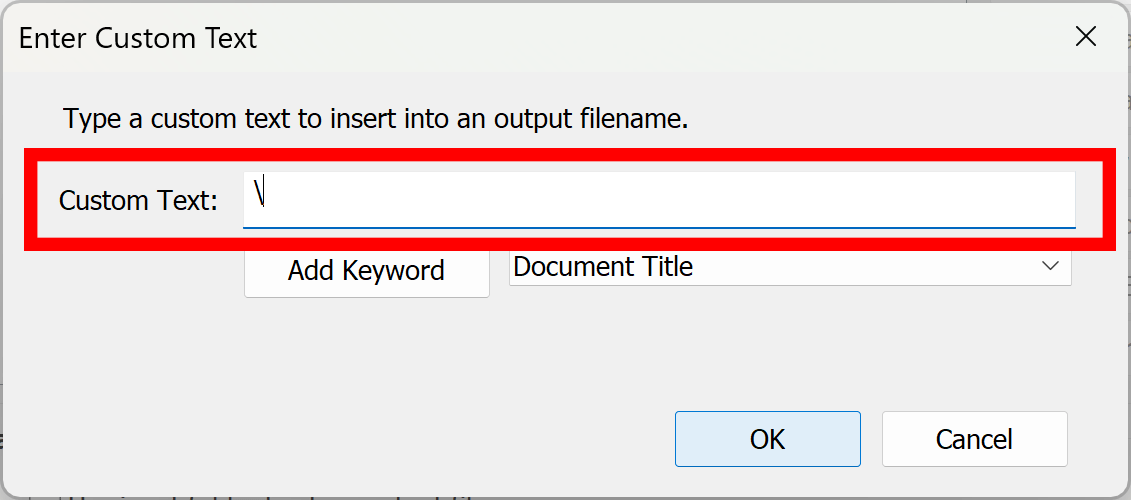
- Select “Custom Text”, and click “Next” button.
-

- Step 16 - Type a Backslash
- Type \ (backslash) into "Custom Text" entry box. This is a closing symbol for the folder in the output path. Press “OK” button.
-
- Step 17 - Define a Naming Scheme for Files
- Now you should see a third entry in the "Append to name:" list. Press "Add..." button again. Now we have to create a file name for each output document.
-
- Step 18 - Select Text From Location Option
- We will assume that filename (without extension) is also extracted from the first page of each output document as it is often the case.
- Select "Text From Location" option and press "Next" button.
-
- Step 19 - Define Page Area For Extracting File Name
- Now position mouse at the page area where you want to extract text for the filename (where invoice number is located) and press and hold left mouse button.
- Draw a box around the area and release mouse button. Now you have defined an area for the text extraction. If you made a mistake simply do it again.
- Press “OK” button once done.
-
- Step 20 - Add File Extension
- Now you should see a forth entry in the "Append to name:" list. Next step is to add a file extension to the filename.
- Press "Add" button one more time.
-
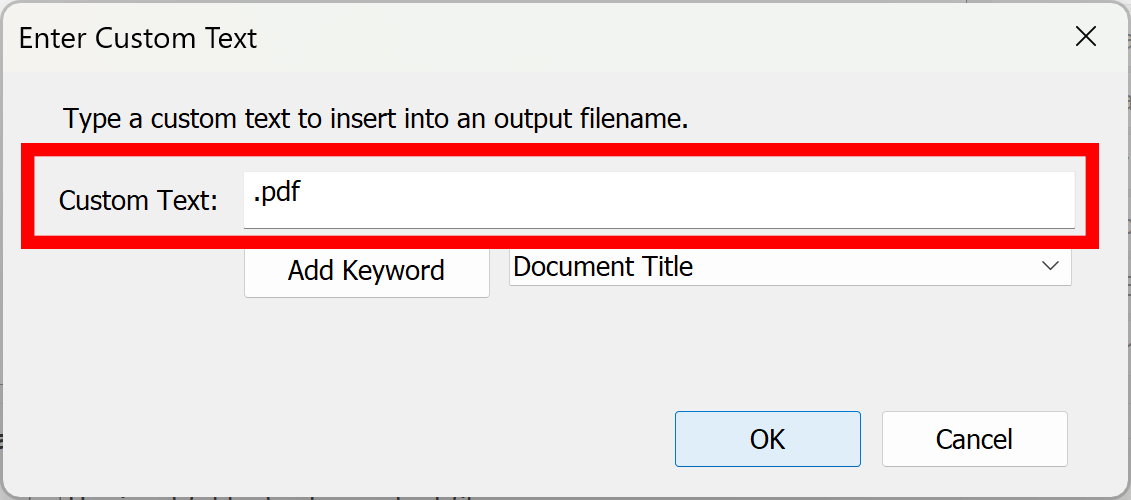
- Step 21 - Select Custom Text Option
- Select “Custom Text”, and click “Next”.
-
- Step 22 - Type “.pdf” File Extension
- Type .pdf into "Custom Text" entry box and press “OK” button.
-
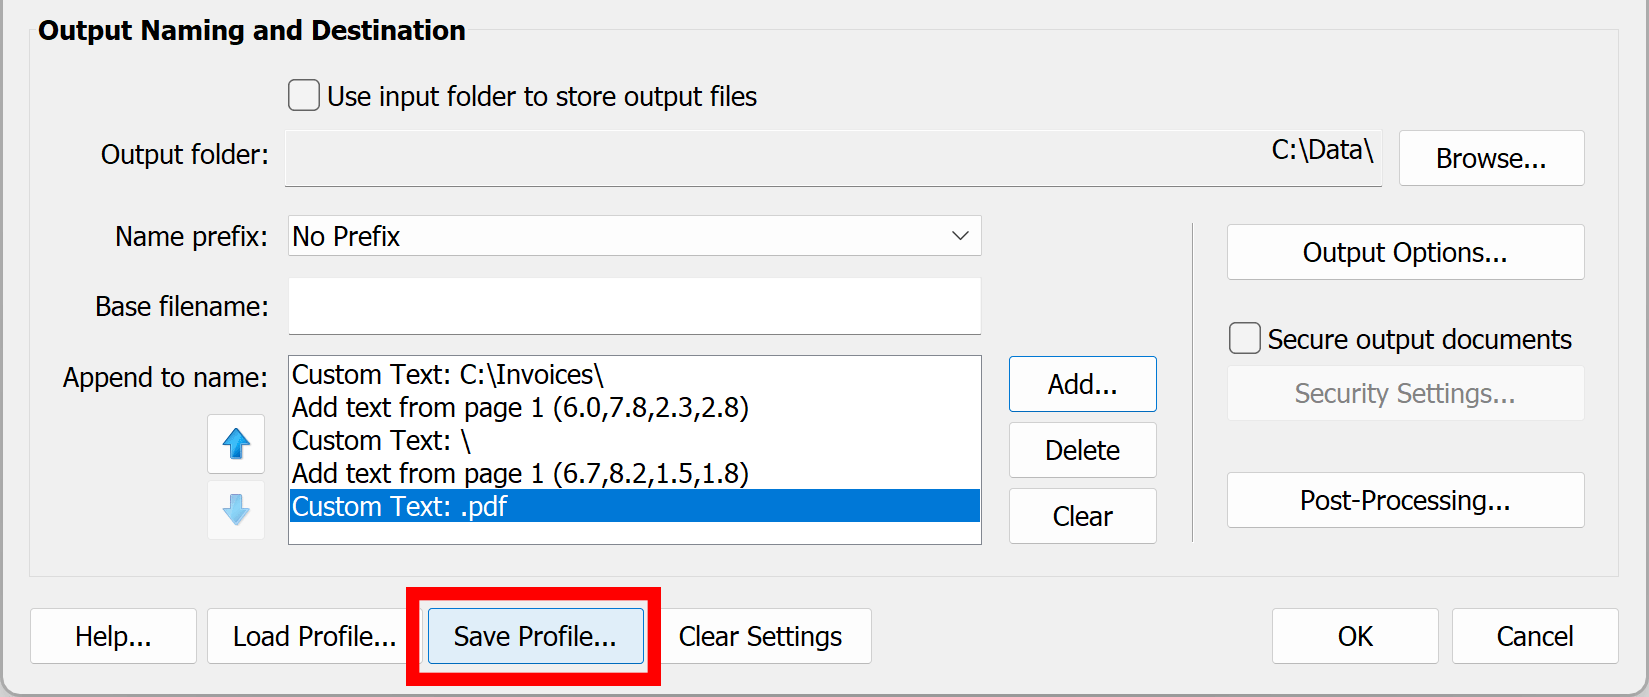
- Step 23 - Save Profile (Optionally)
- Now you should see a fifth entry in the "Append to name:" list. We have completed configuring a file naming scheme for saving files into sub-folders. Both sub-folder and file names will be extracted from a specified locations on first page of each output document. If certain folders specified by the path do not exist, then they will be automatically created. Exercise caution while designing the file naming scheme since it may cause creating a large number of unwanted folder if settings are incorrect.
-
IMPORTANT: You have to make sure that text used to create folders and file names (while using this method) conforms to the
Windows file naming rules and restrictions.
The text used to makeup folder names should not contain:
- "*?<>:|.
The text used to create file names should not contain the following characters:- \"/*?<>:|
-
- Press "Save Profile..." button to save splitting configuration into APR file for future reuse.
You can later restore this exact splitting configuration by using “Load Profile…” button and selecting a previous saved file.
-
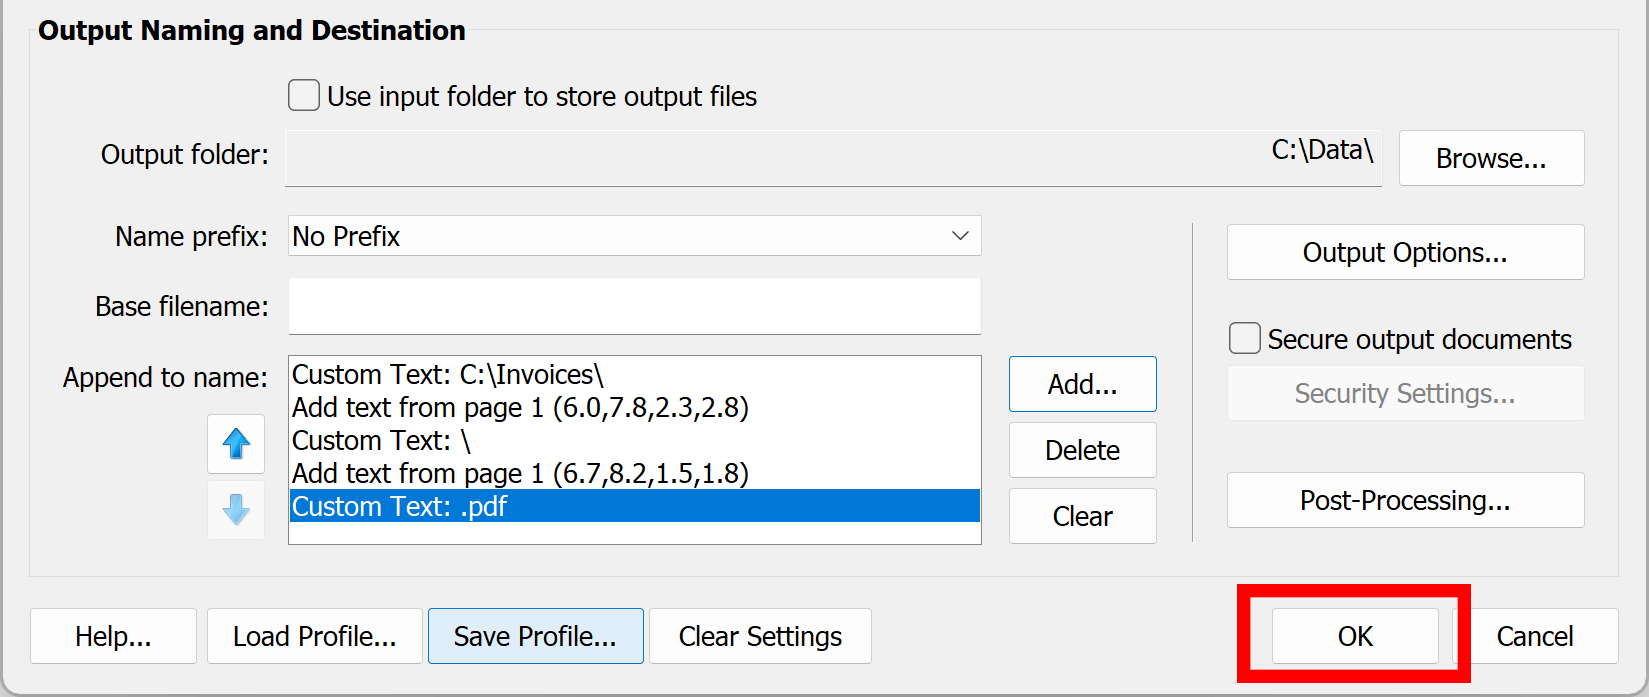
- Step 24 - Confirm Settings
- No need to specify an output folder via "Browse..." button, because it is going to be assembled from various naming parts specified in “Append to name” list.
- Click "OK” button to proceed.
-
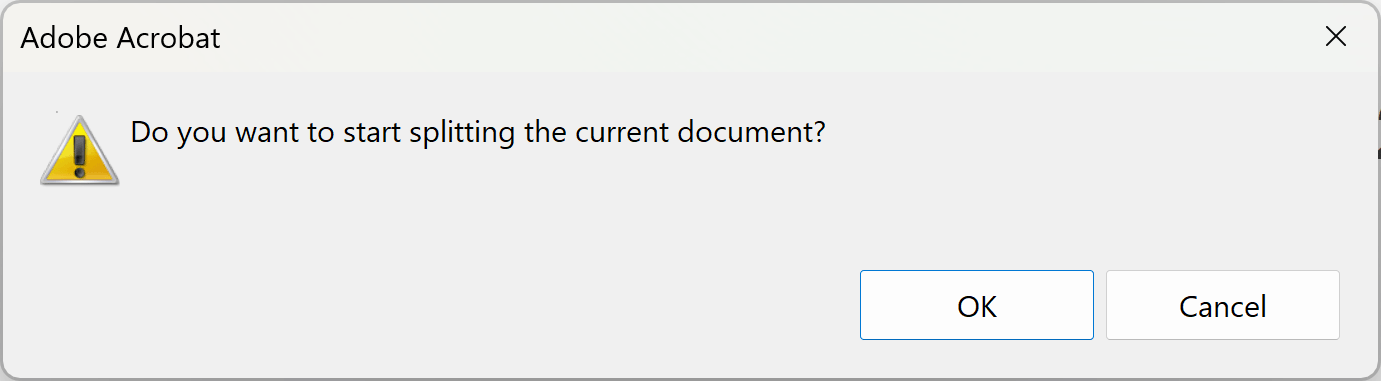
- Step 25 - Start Splitting Process
- Click “OK” in the dialog box to start the process.
-
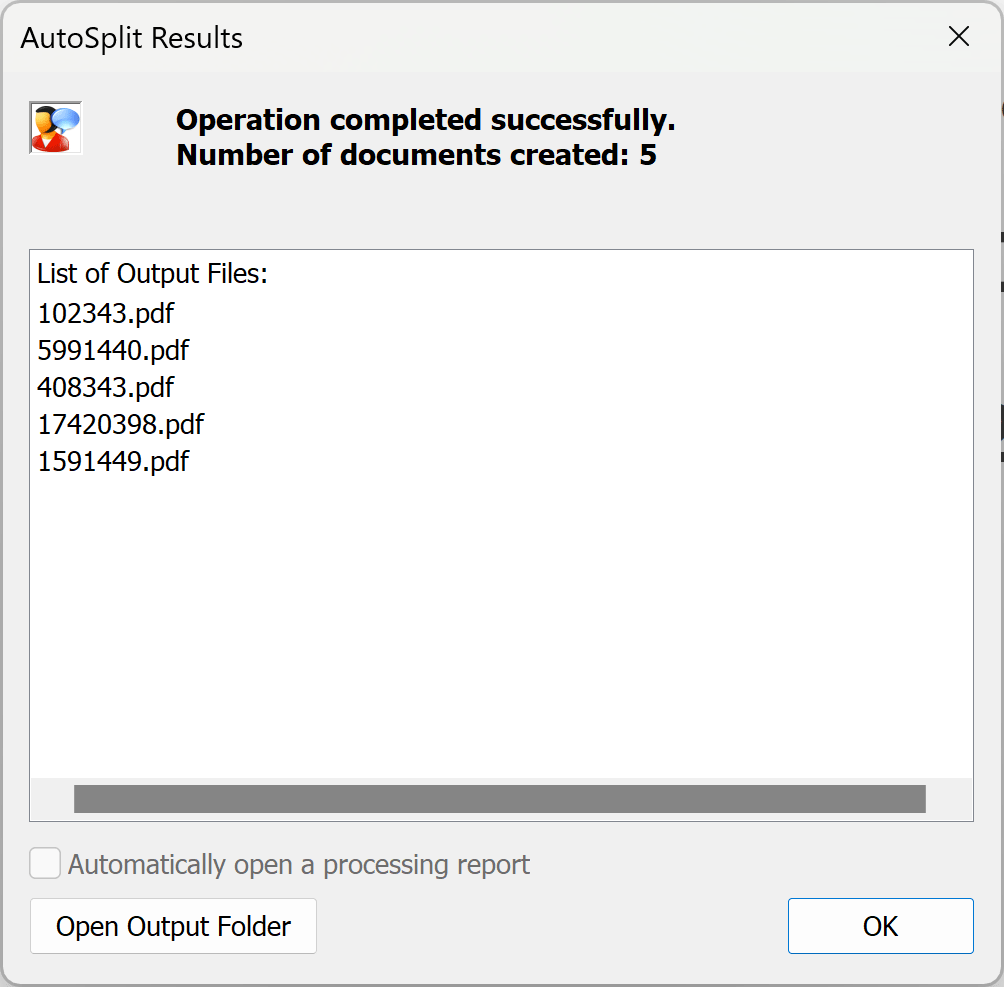
- Step 26 - Examine Output Files
- The “AutoSplit Results” dialog appears on screen once the processing is completed.
- The “Results” dialog shows a complete list of output files (without full path) that were created during the processing. The AutoSplit plug-in has splitted each invoice as a separate PDF file, named it by the invoice number, sorted and saved according to its "billing type" into a proper sub-folder.
-
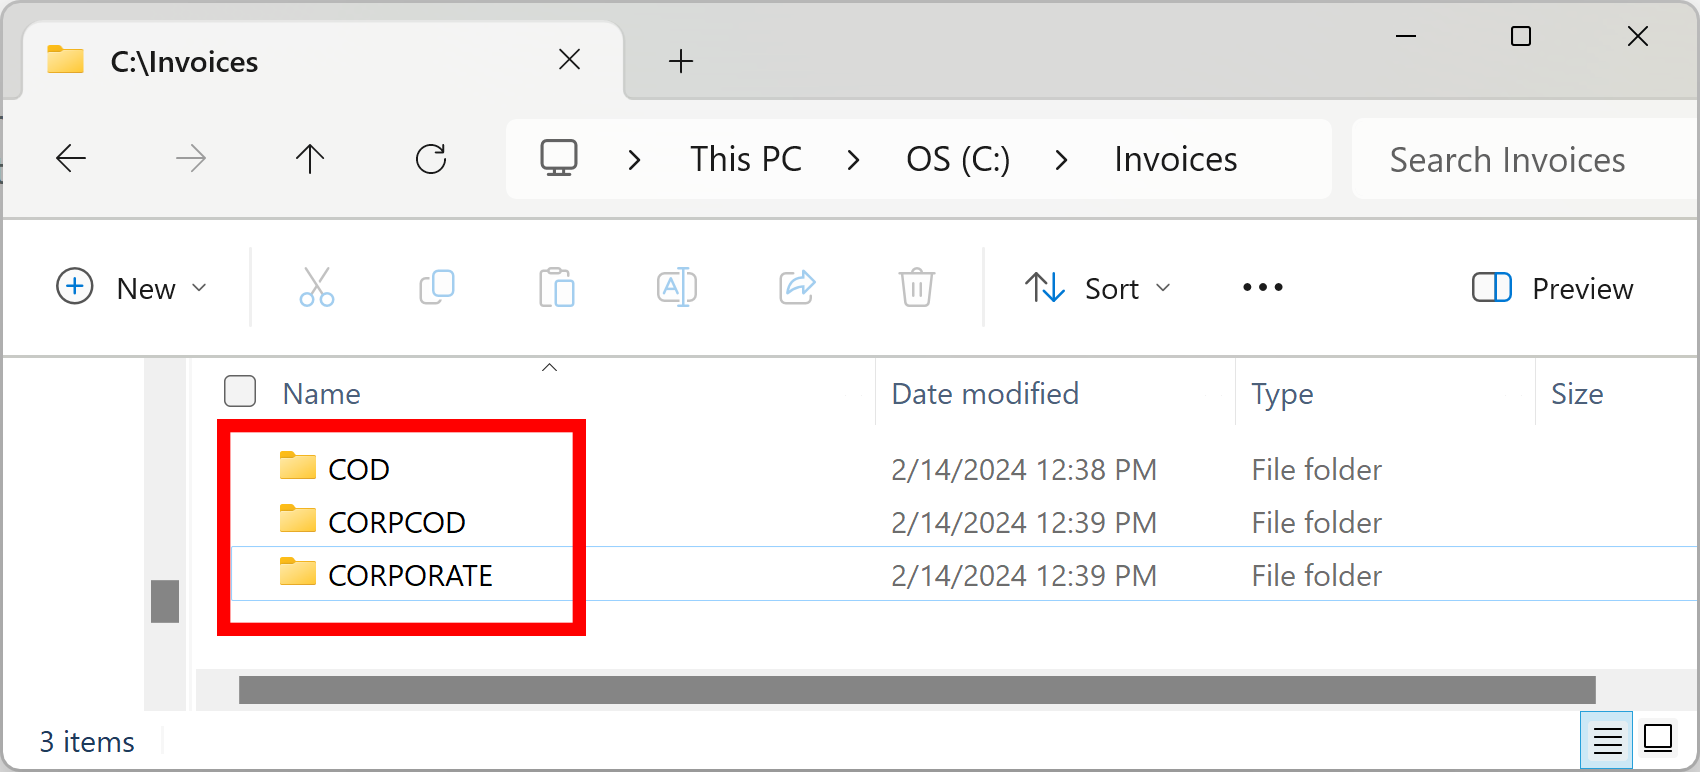
- All sub-folders are going to be created automatically at the time of the processing (c:\Invoices\COD, …\CORPCOD, …\CORPORATE).
-
- Click here for a list of all step-by-step tutorials available.