Placing Multiple Data Records into a Single PDF Form
AutoMailMerge plug-in for Adobe® Acrobat®
- Introduction
- It is often necessary to use information from multiple data records to fill a single PDF form field. For example, to list multiple items on a single invoice - or to put multiple people on a single tax form etc. This can be achieved using the AutoMailMerge plug-in with “record grouping” processing option applied.
- Record grouping dynamically combines multiple data records into a single data record, based on a data field value. For example, if we need to have multiple records available while filling a single copy of a PDF form, we can add a “grouping” field/column to the data file. All consecutive records that belong to the same “group” should have the same value in this field. All data records in the group are accessible while populating a single copy of the PDF form.
- Tutorial Overview
- In this tutorial, we will show how to populate a single PDF form with multiple data records. We will use invoices as an example. Data records for each invoice will be grouped based on an invoice number. We will also show how to use “multi-line” PDF form fields to hold variable number of records.
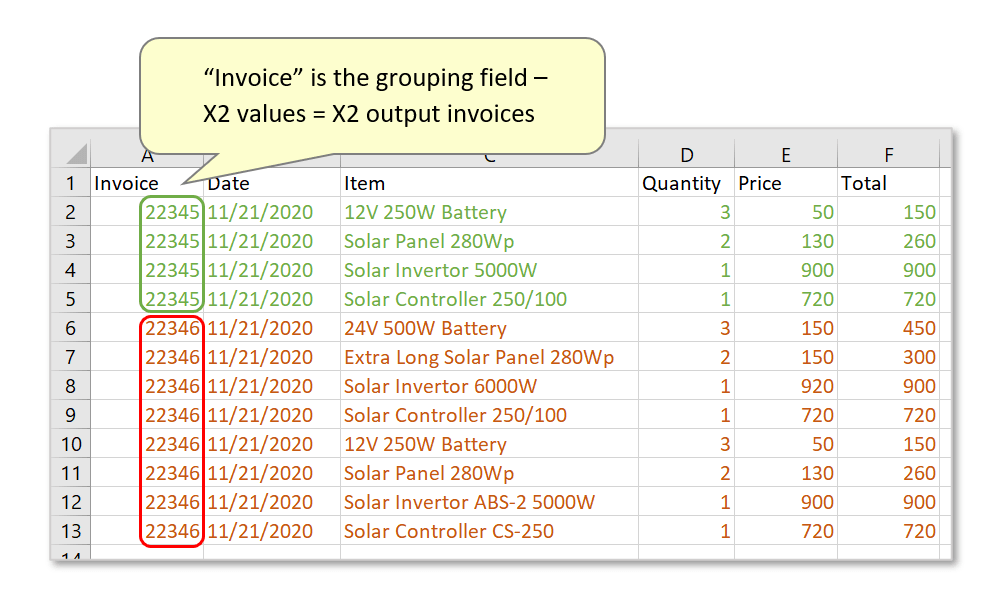
- The “Invoice” column used in the tutorial acts as the “grouping field” – featuring two different invoice numbers. All consecutive records belonging to the same invoice number will be placed into a single PDF form. Note that the records are color coded for demonstration only to show grouping of the records.
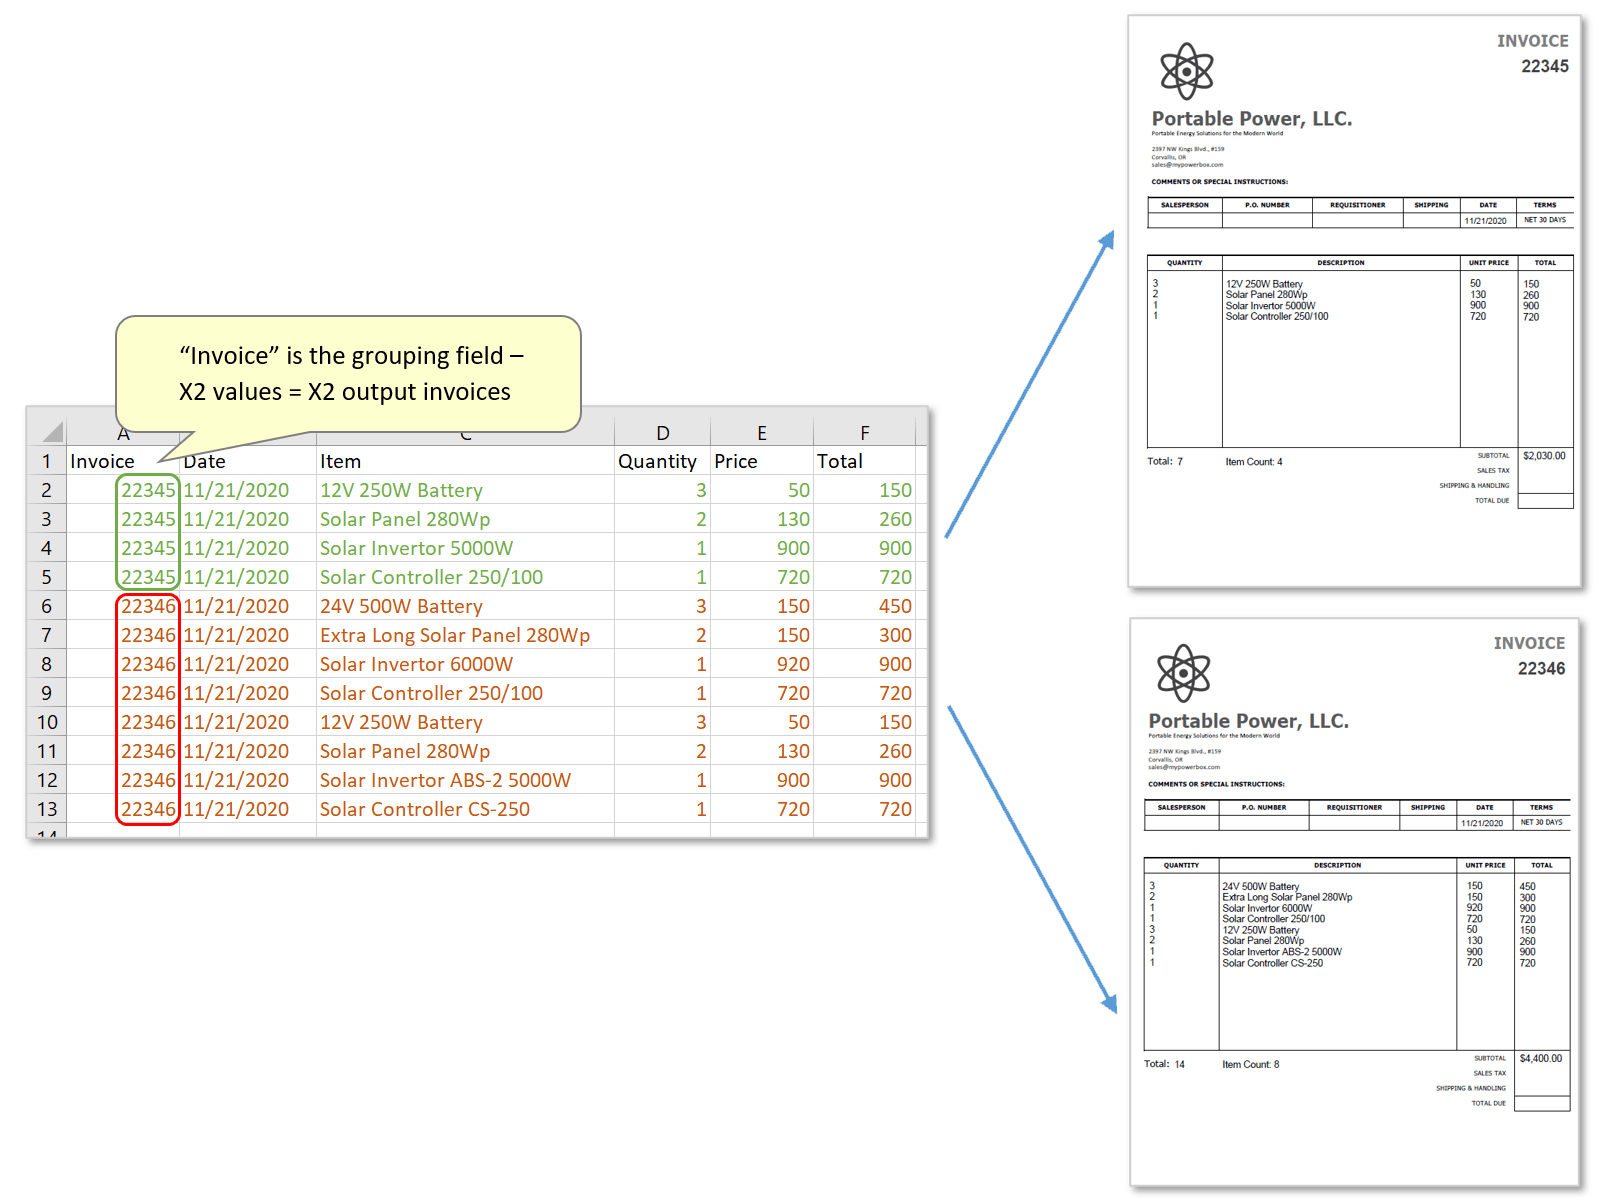
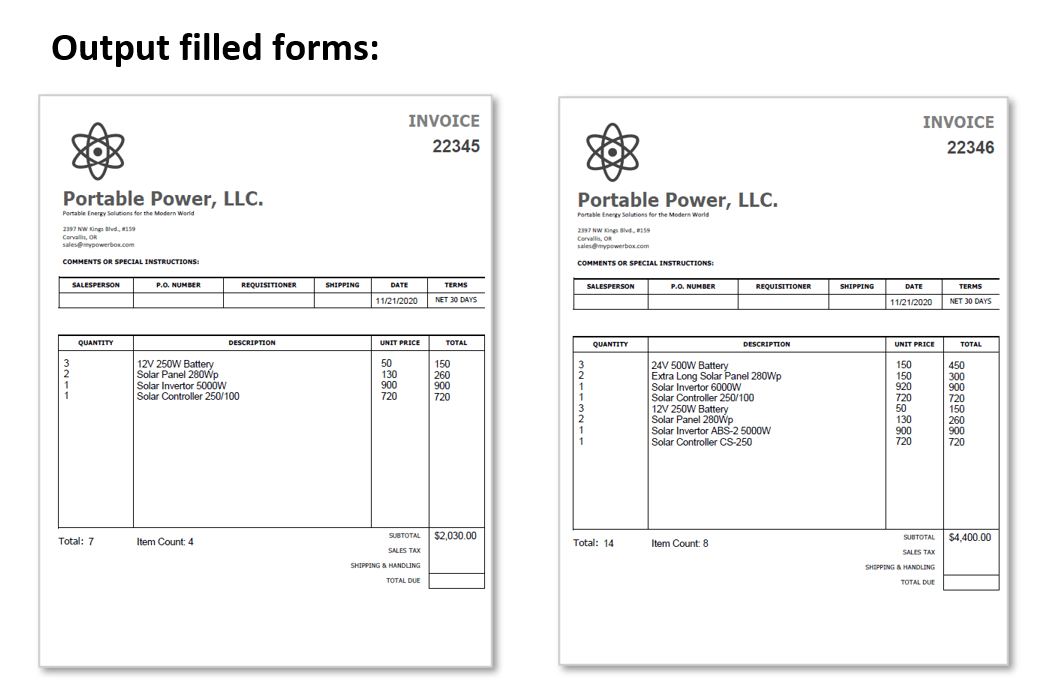
- Running a mail merge with record grouping enabled (using the “Invoice” field) on this example, will produce only TWO output invoices - one filled PDF form for each unique value in the “Invoice” field. The first 4 records have the same value of “22345” and will be used to fill the first form. The remaining records share the same value of “22346” and will be used to fill the second form:
- IMPORTANT: it doesn't matter what specific values (numbers or text) are used in the “grouping” field/column. Consecutive records with the same value in this column are grouped together, and become accessible while populating a single PDF form. You can refer to the individual data values from multiple data records and use them to populate different form fields.
- Creating PDF Forms with "Multi-line" Fields
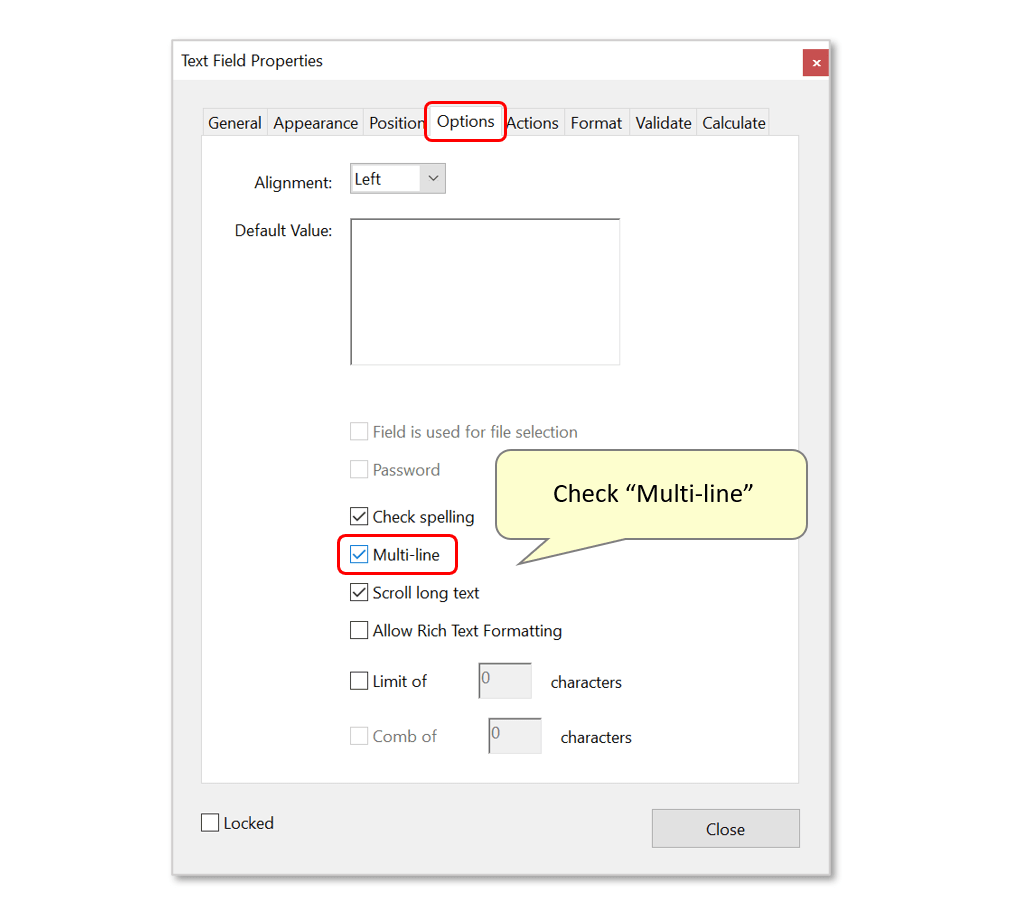
- To use this method, it is necessary to enable "multi-line" functionality for the necessary PDF form fields. See the separate tutorial for general help with creating interactive PDF forms. With the PDF form open in Acrobat, go to "Tools > Prepare Form". Double-click on a form field, or right-click on it and press "Properties...". Open the "Options" tab and check the box next to "Multi-line".
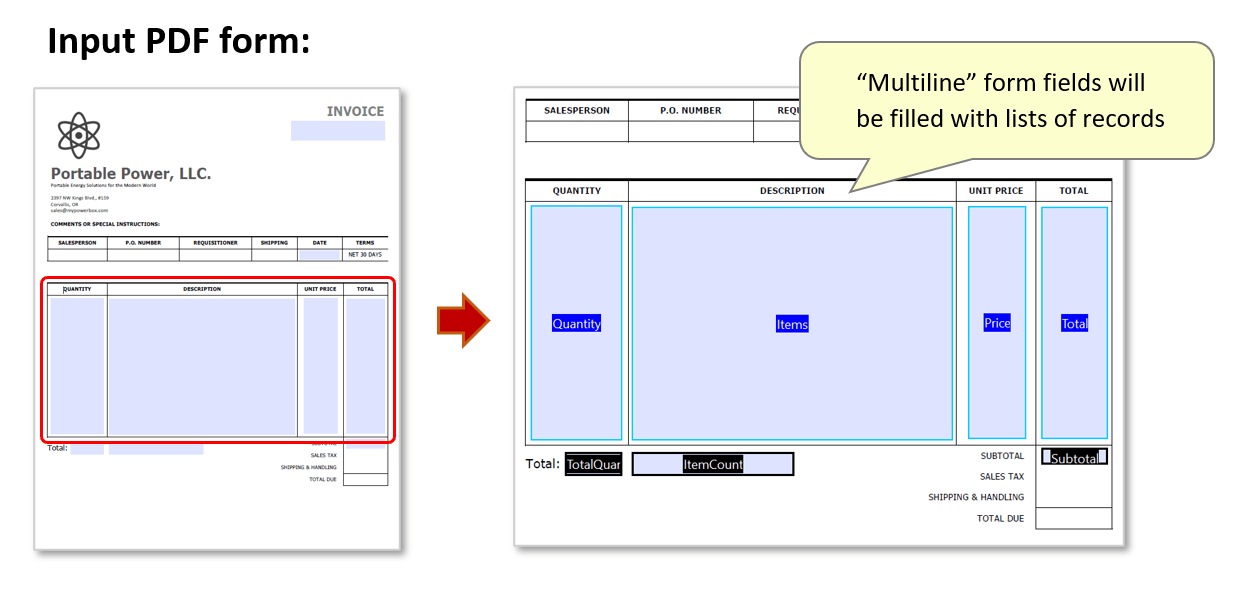
- Input PDF Form
- In our sample invoice PDF form, there are 4 multi-line text fields: "Quantity", "Items", "Price" and "Total". These fields will hold multiple lines of text since number of items on each invoice can be different. There are also 5 single-line text fields. The "Invoice" and "Date" fields will be always populated with a single value (it is identical to all data records that belong to the same invoice). The "TotalQuantity", "ItemCount" and "Subtotal" fields will be used to show calculated values such as item count and sum of all values in the field.
- Prerequisites
- You need a copy of Adobe® Acrobat® along with the AutoMailMerge™ plug-in installed on your computer in order to use this tutorial. Both are available as trial versions.
Step-by-Step Tutorial
- Workflow Overview
-
- Create a PDF form template using "Prepare Form" tool.
- Prepare a spreadsheet with data records.
- Configure mail merge settings and map data fields to PDF form fields.
- Run the mail merge to create PDF documents.
- Step 1 - Open the "Mail Merge" Dialog
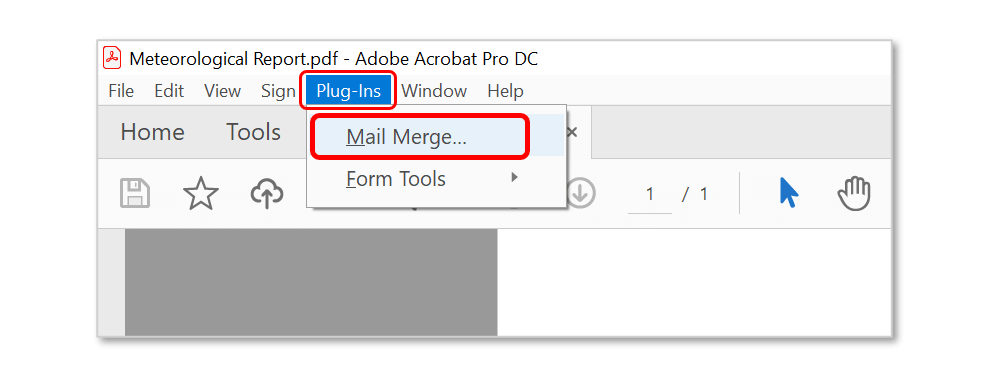
- Select Plugins > Mail Merge… to open the Mail Merge dialog.
- If you are using a new Adobe Acrobat interface, then you can locate Mail Merge menu here:

- Please see the following page for a short video tutorial on how to locate Plugins menu in the new Adobe® Acrobat® interface.
- If you are using a "classic" Adobe Acrobat interface (pre-2022), then you can locate Mail Merge menu here:
- Step 2 - Edit Mail Merge Settings
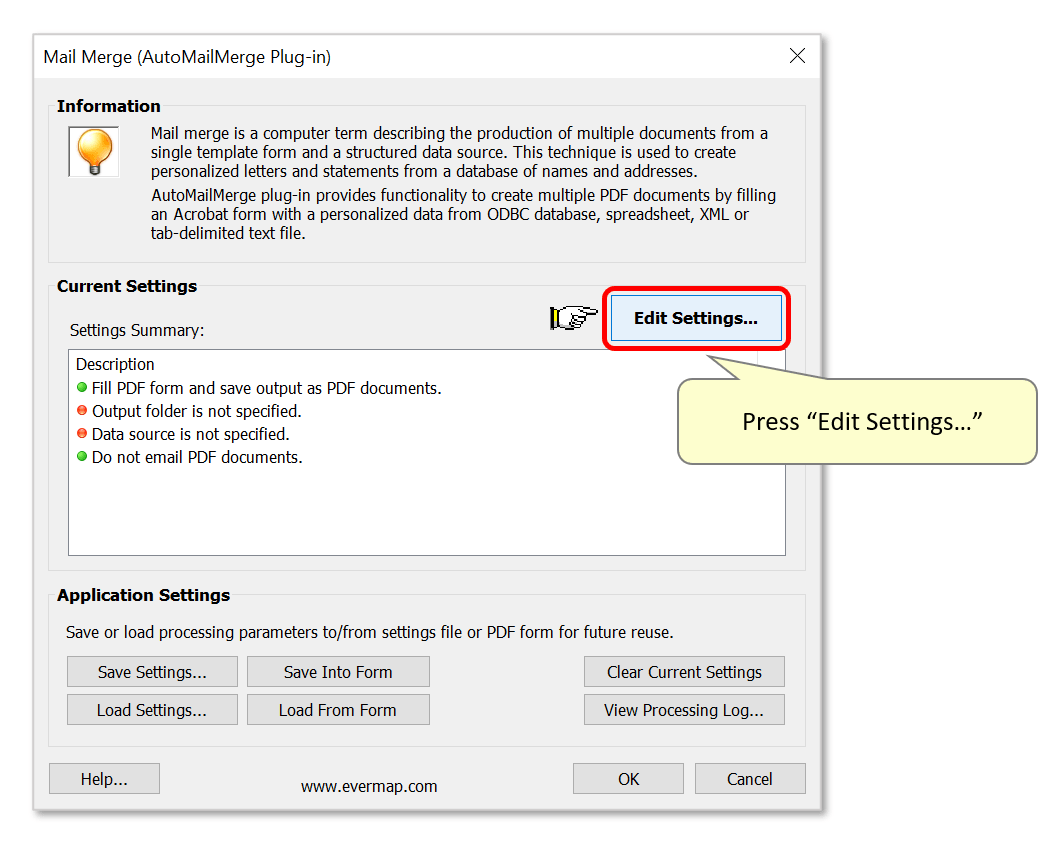
- If necessary, clear current settings and then press the "Edit Settings…" button.
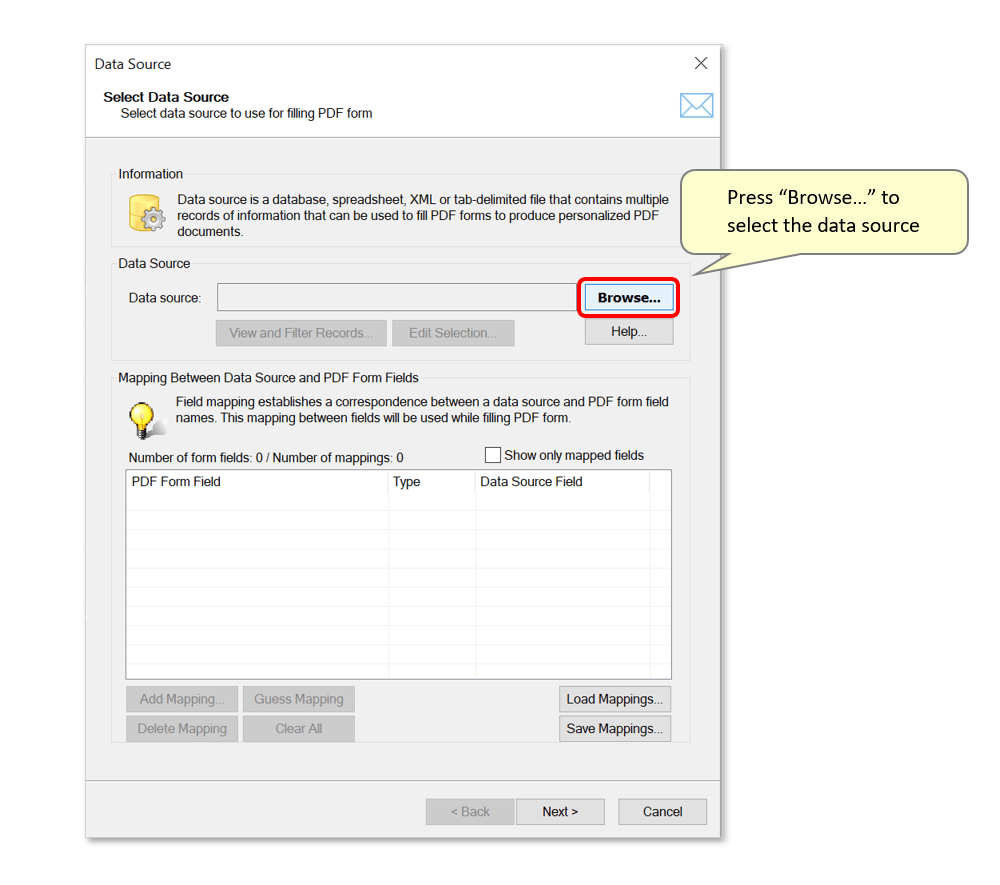
- Press the "Browse…" button in the "Data Source" dialog to select the input data file.
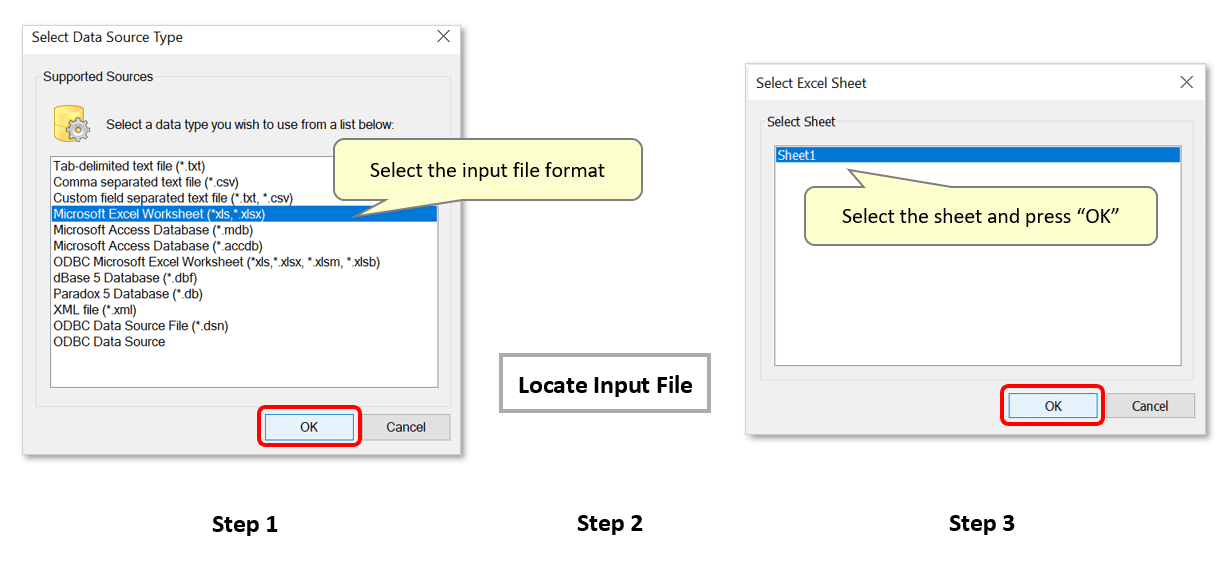
- Select a data type to use from the list (e.g.: Microsoft Excel Worksheet), then press "OK". Use the dialog that opens to locate and select the source file, then select the worksheet in the final dialog. You can download a sample CSV spreadsheet that is used in this tutorial.
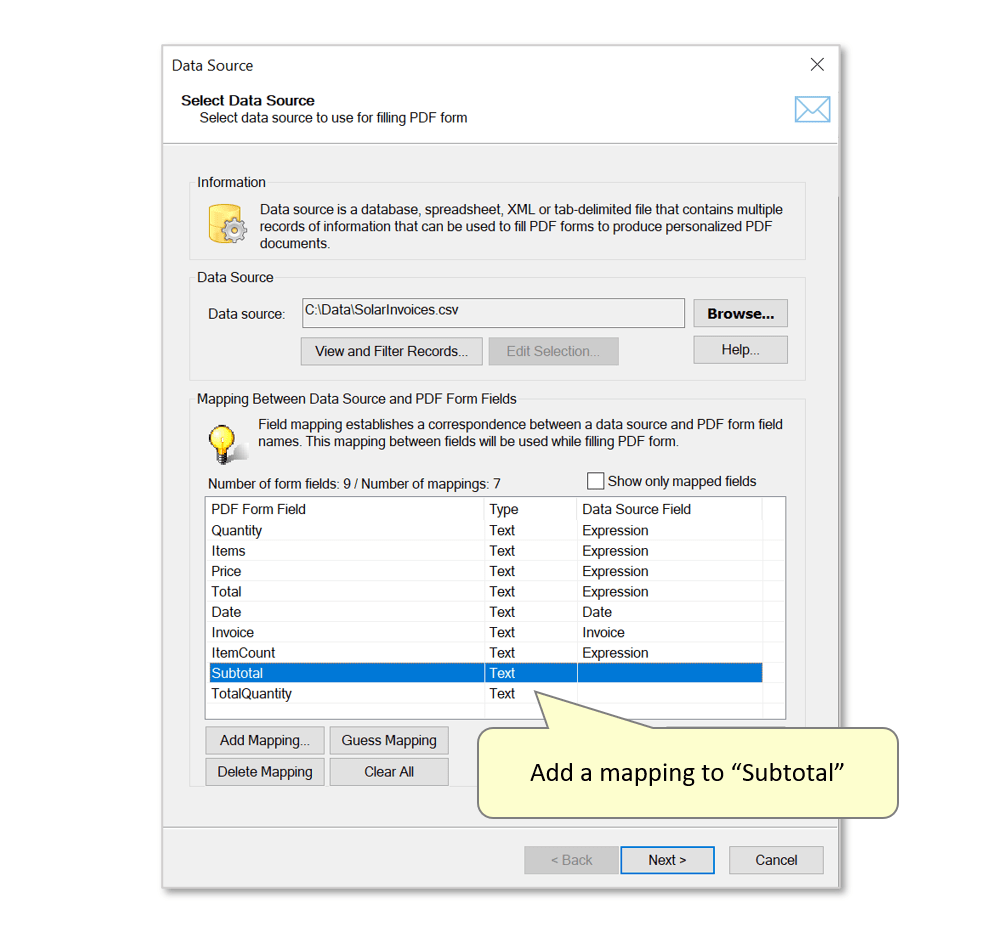
- Step 3 - Add Mappings to Show a List of Records
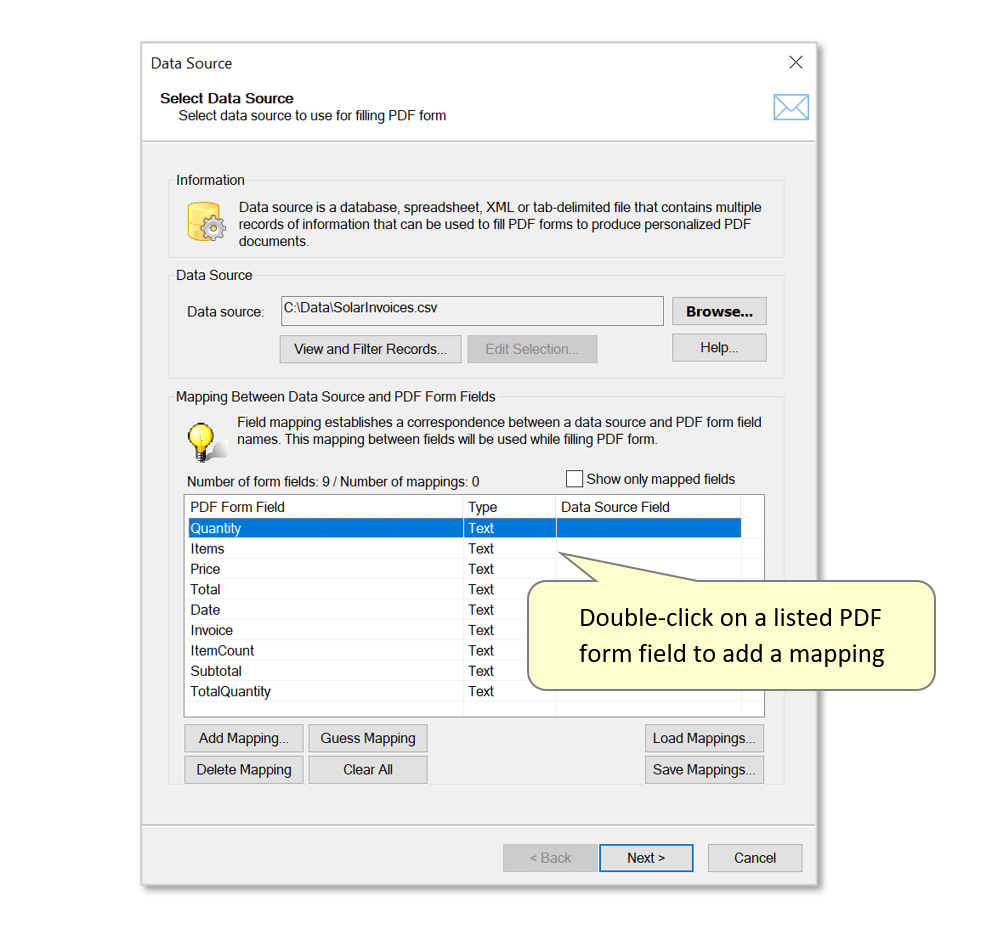
- All interactive fields in the PDF form will now be listed here.
- In this example, we will begin by mapping the multi-line PDF form fields that are to contain listed items (Quantity/Items/Price/Total), to their corresponding data fields. Double-click on a form field, or select it and press "Add Mapping...".
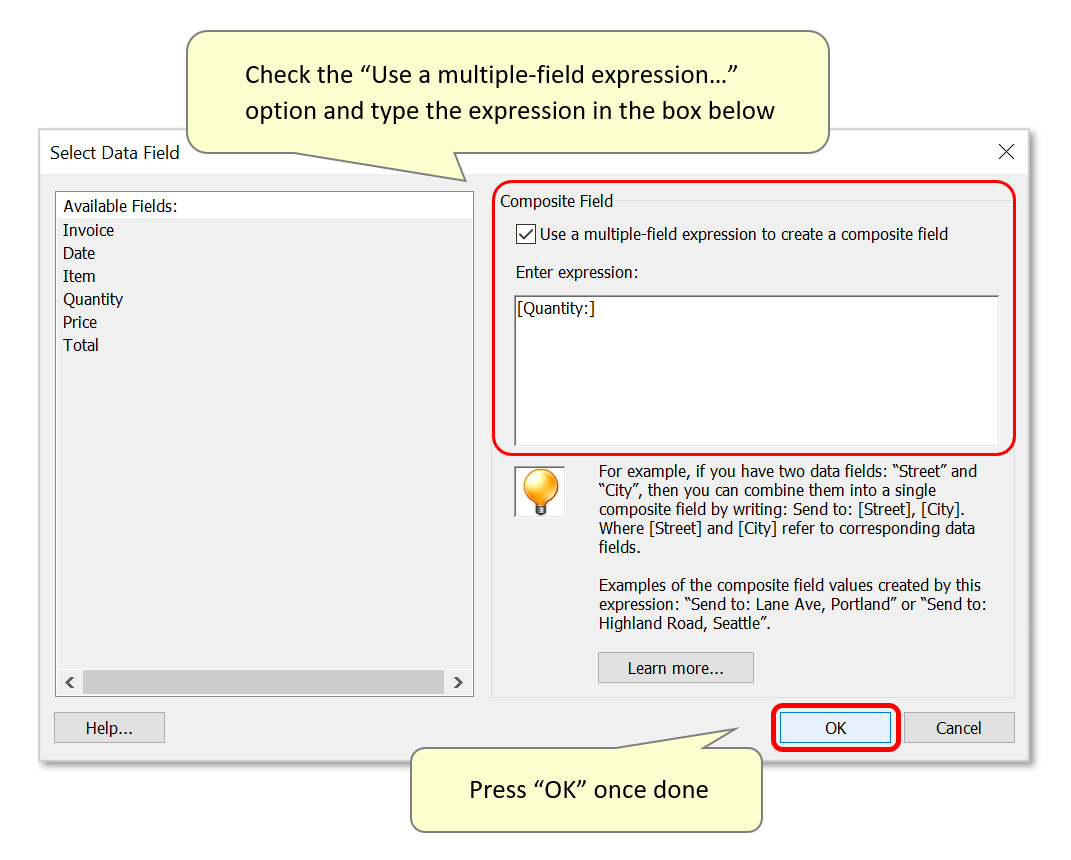
- Check the "Use a multiple field expression..." option, and enter the desired expression in the box below. In this example, we will use a [FieldName:] expression - [Quantity:]. Use this syntax to get all values of a specific field placed in the output. All values in the "Quantity" column (see data source image above) will be listed in the "Quantity" form field. Each value will be listed on a separate text line.
- Press "OK" once done.
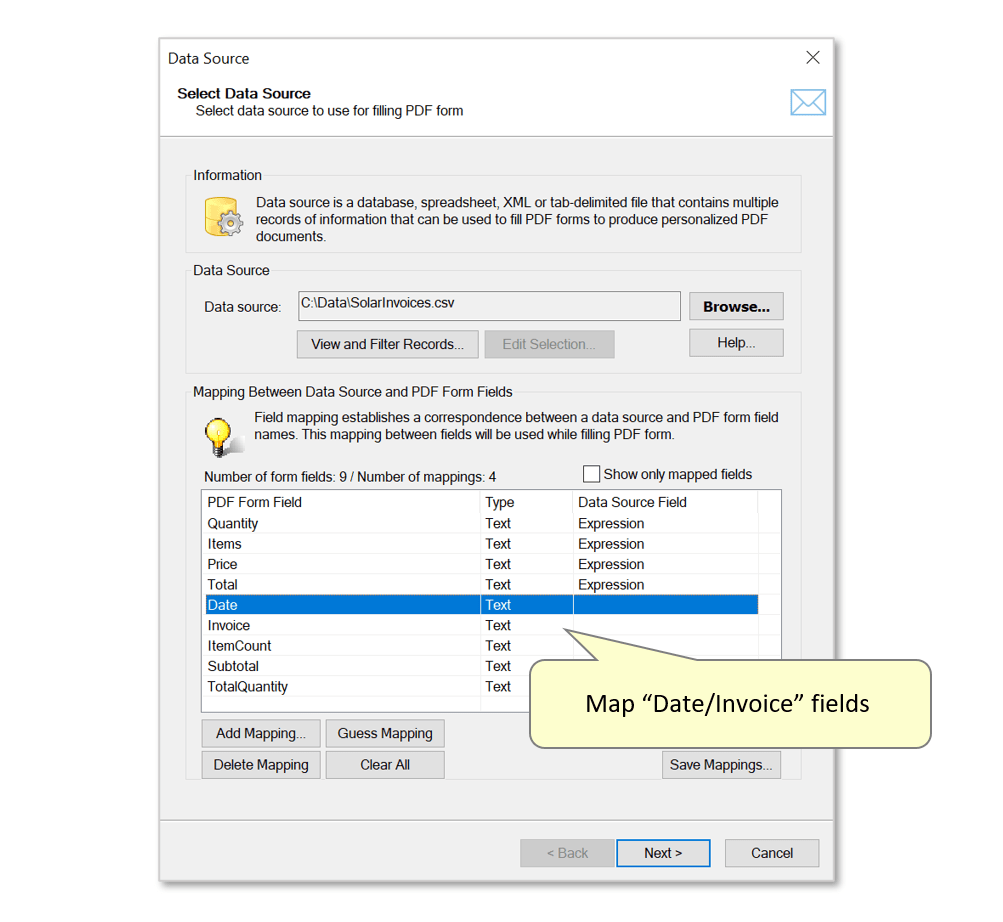
- Create mappings for the "Items/Price/Total" fields in the same way - e.g: [Item:] / [Price:] / [Total:].
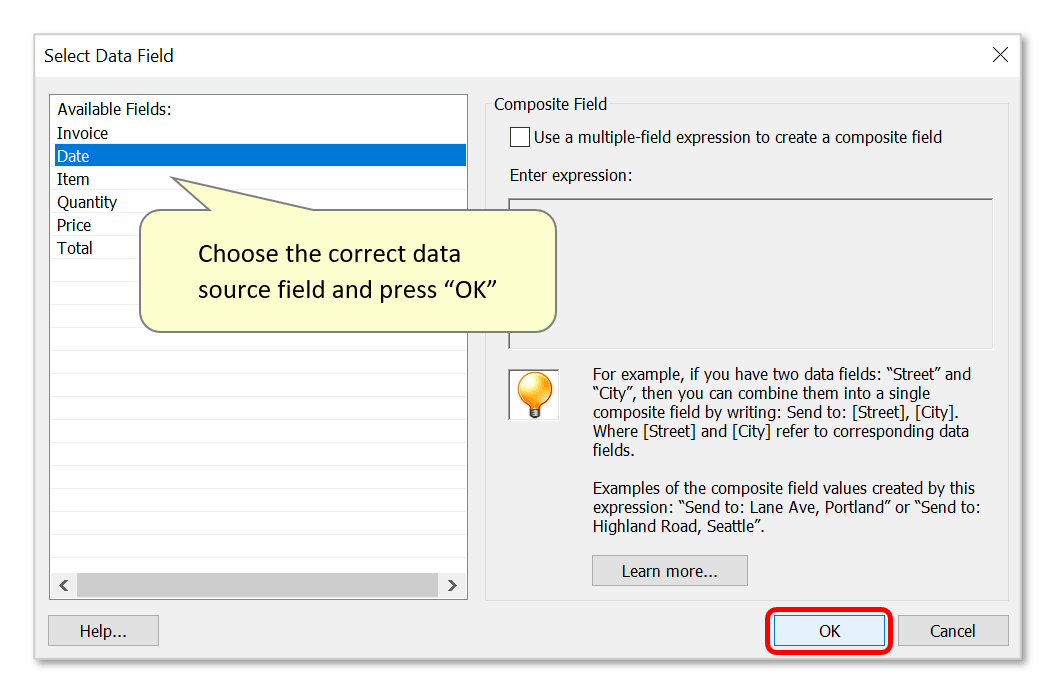
- Now, we will map the "Date/Invoice" fields directly to their corresponding data fields. No expressions are required for these mappings since these values are identical to all records for the same invoice.
- Select the relevant data field from the list provided, and press "OK".
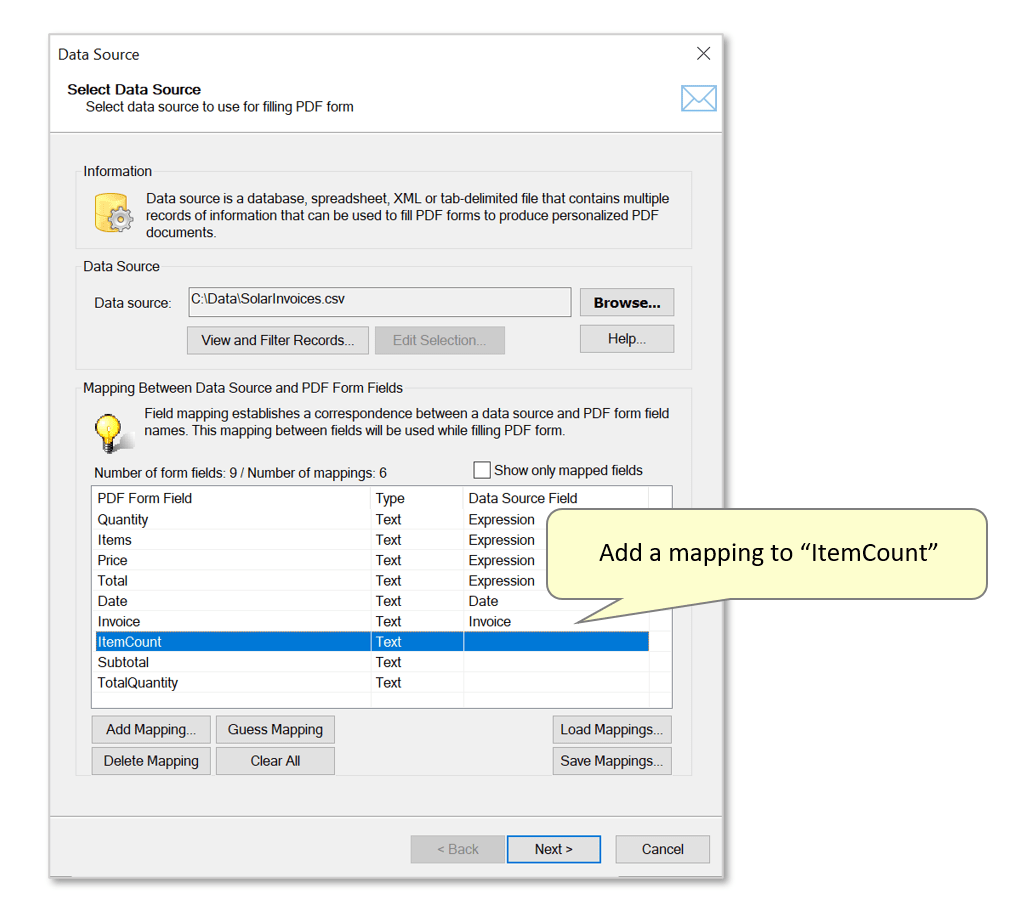
- Step 4 - Add Mappings to Show the Number of Records in a Group
- Next, we are going to add some calculated values to the invoice. Double-click on "ItemCount" to add a mapping.
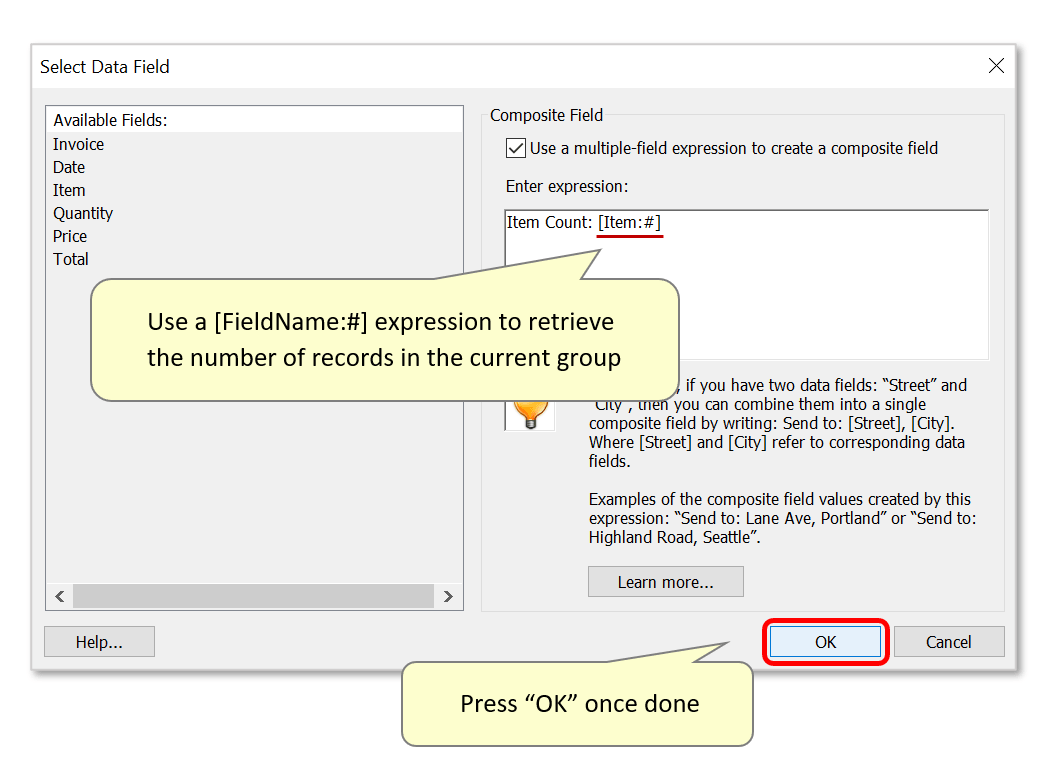
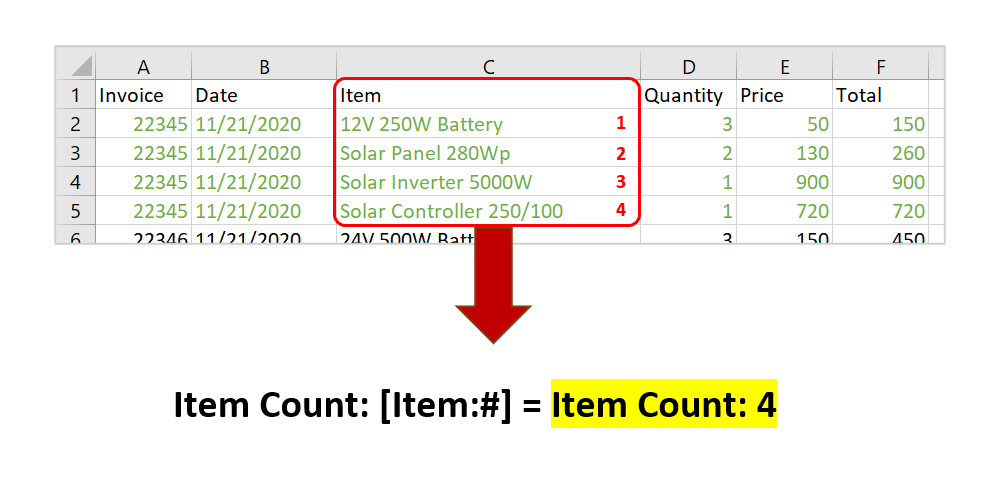
- Use a [FieldName:#] expression to retrieve the number of records in the current group. In this example, the first output invoice (22345 group) contains 4 items in the "Item" column. We will use this expression: Item Count: [Item:#]. The regular text "Item Count:" will be placed in the form field, followed by the calculated number (total record count in the group).
- Press "OK" to proceed.
- As there are 4 "Item" values for this record group/invoice, "Item Count: 4" will be placed in the output form field during the mail merge process.
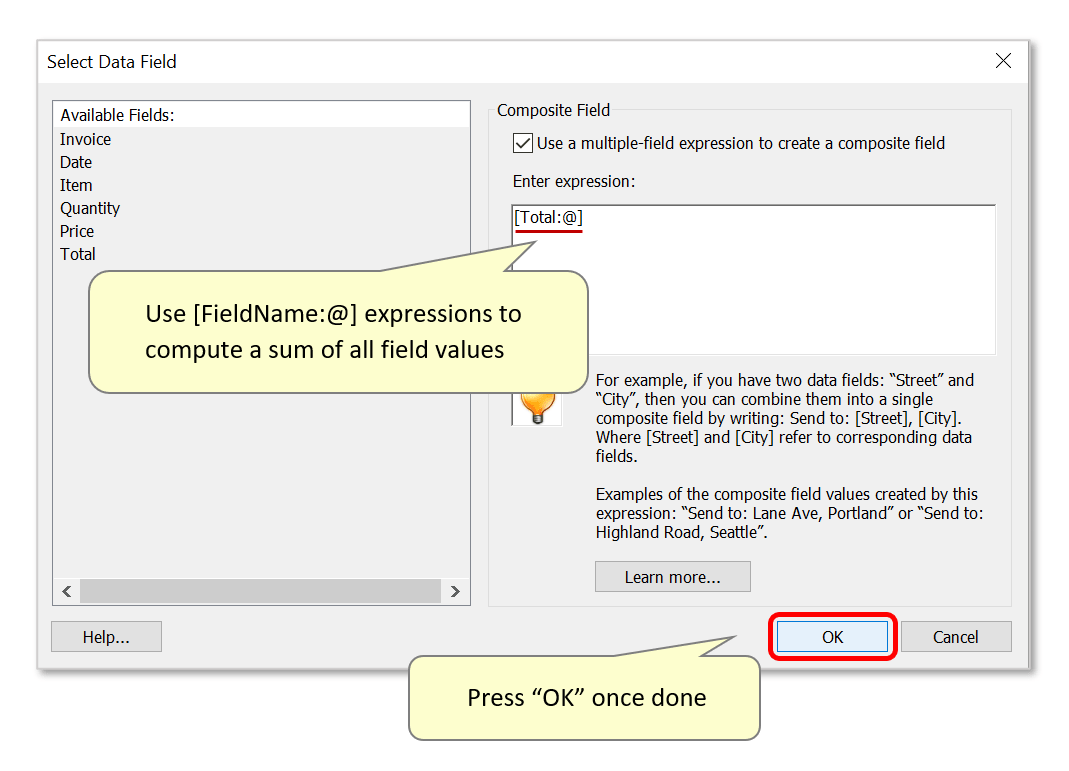
- Step 5 - Add Mappings to Compute a Sum of All Values in the Field
- Double-click on "Subtotal" to add a mapping.
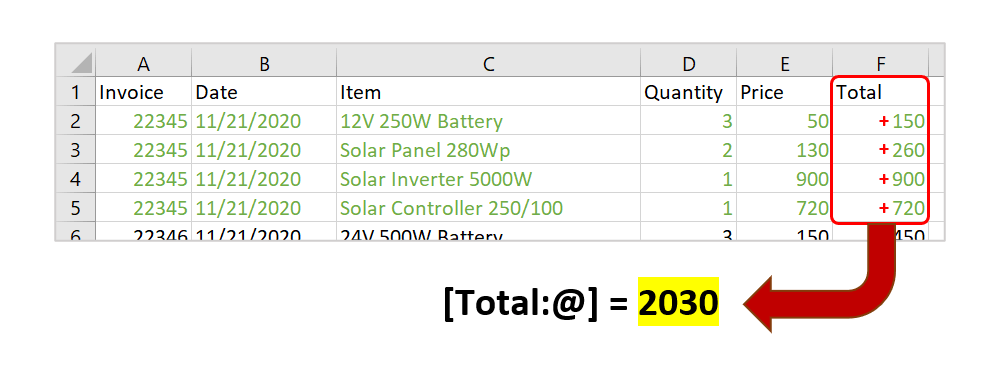
- Use a [FieldName:@] expression to compute a sum of all field values in the current record group. This comes in handy when computing a "total" of all of the field's values when preparing invoices or quotations. In this example, the first output invoice (22345 group) contains 4 numbers in the "Total" column. We will use a [Total:@] expression to compute a sum of these numbers.
- Press "OK" to proceed.
- The sum of these numbers is "2030".
- IMPORTANT: only numeric values are used when computing a sum. If a field's value starts with a symbol (other than + or -) or is enclosed in brackets, it will be ignored.
- Use form field properties settings to control the display format of the resulting number. With the PDF form open in Acrobat, go to "Tools > Prepare Form". Double-click on the necessary form field (Subtotal), or right-click on it and press "Properties...". Open the "Format" tab and choose a "Number" format category. Also specify a variety of style options such as a number of decimal digits and currency symbol for the output form field's content.
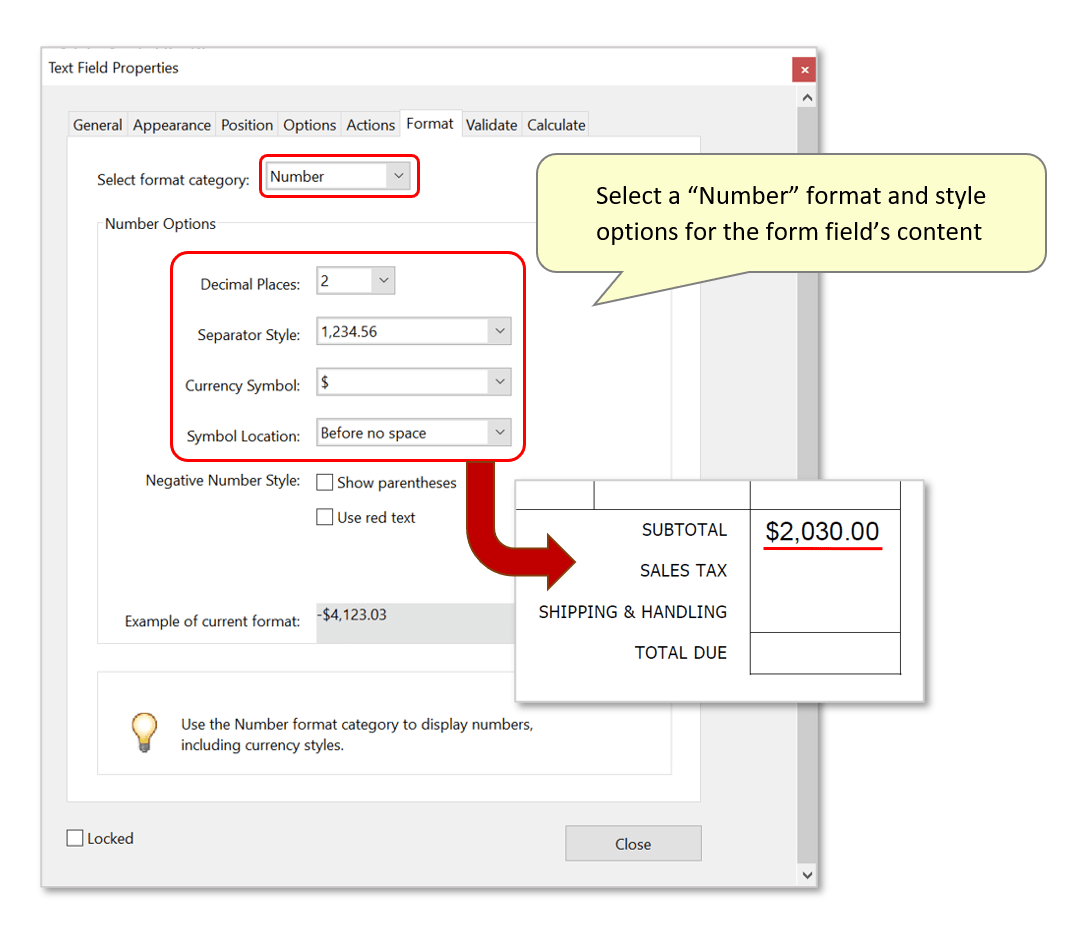
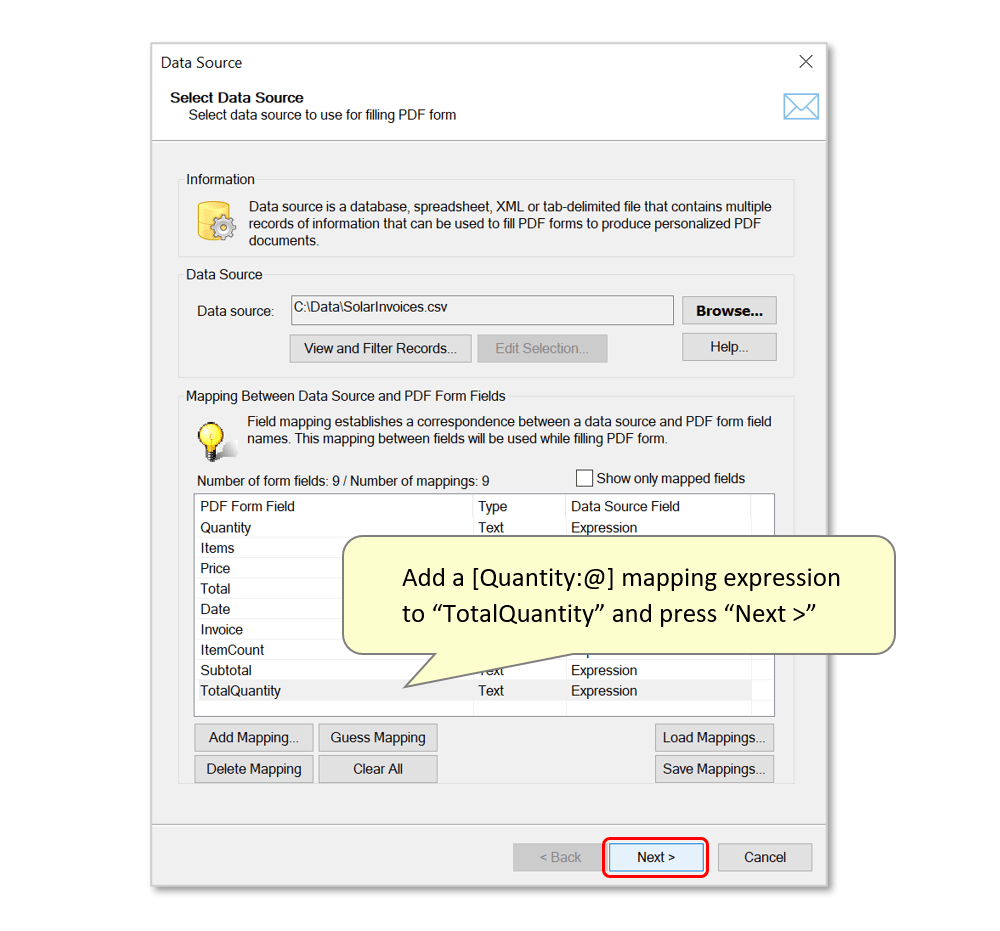
- We've added a [Quantity:@] mapping expression to fill the "TotalQuantity" form field in a similar way (see output). The "TotalQuantity" form field has a format option set to display numbers as integers.
- Press "Next >" to proceed.
- Step 6 - Enable Record Grouping
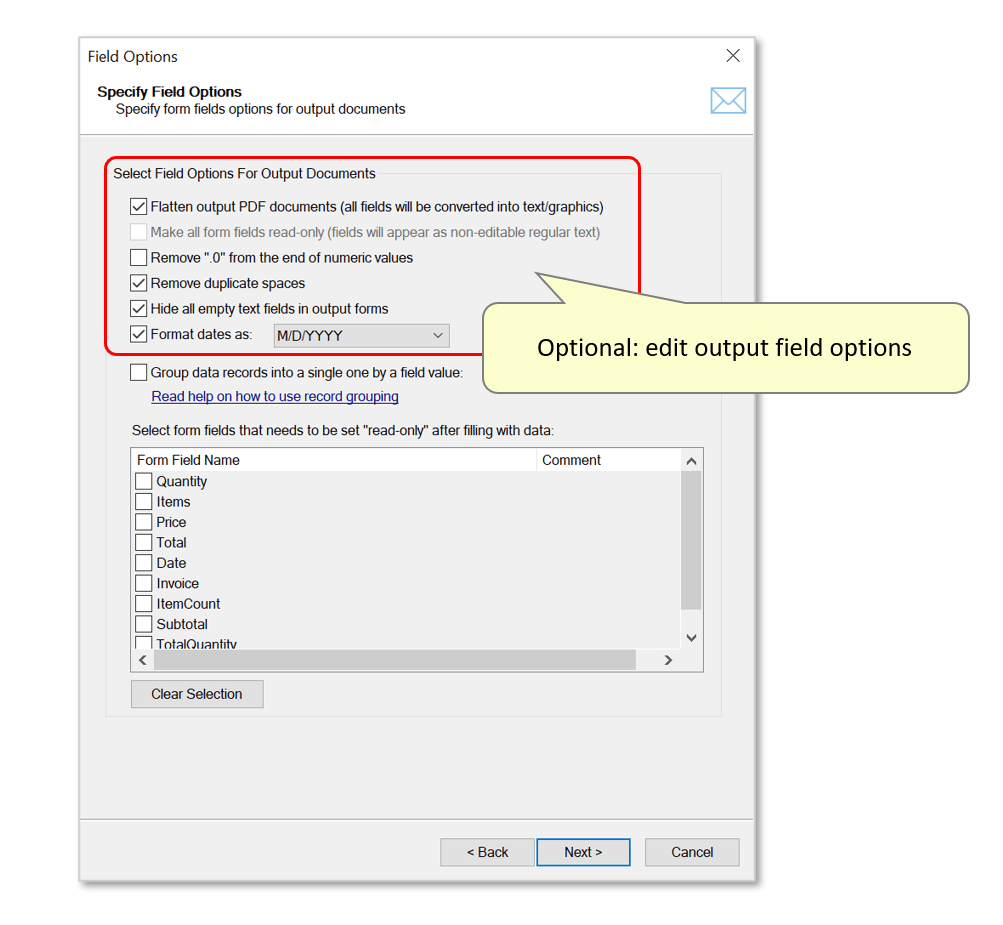
- Use this screen to modify form field options for the output documents. Ensure the "Flatten output PDF documents..." option is checked if it is necessary to convert form fields into regular text in the output document(s) so that they are no longer "editable". In this example, we have also disabled the plug-in from removing ".0" from the end of numeric values, and instructed it to hide all empty text fields in output forms.
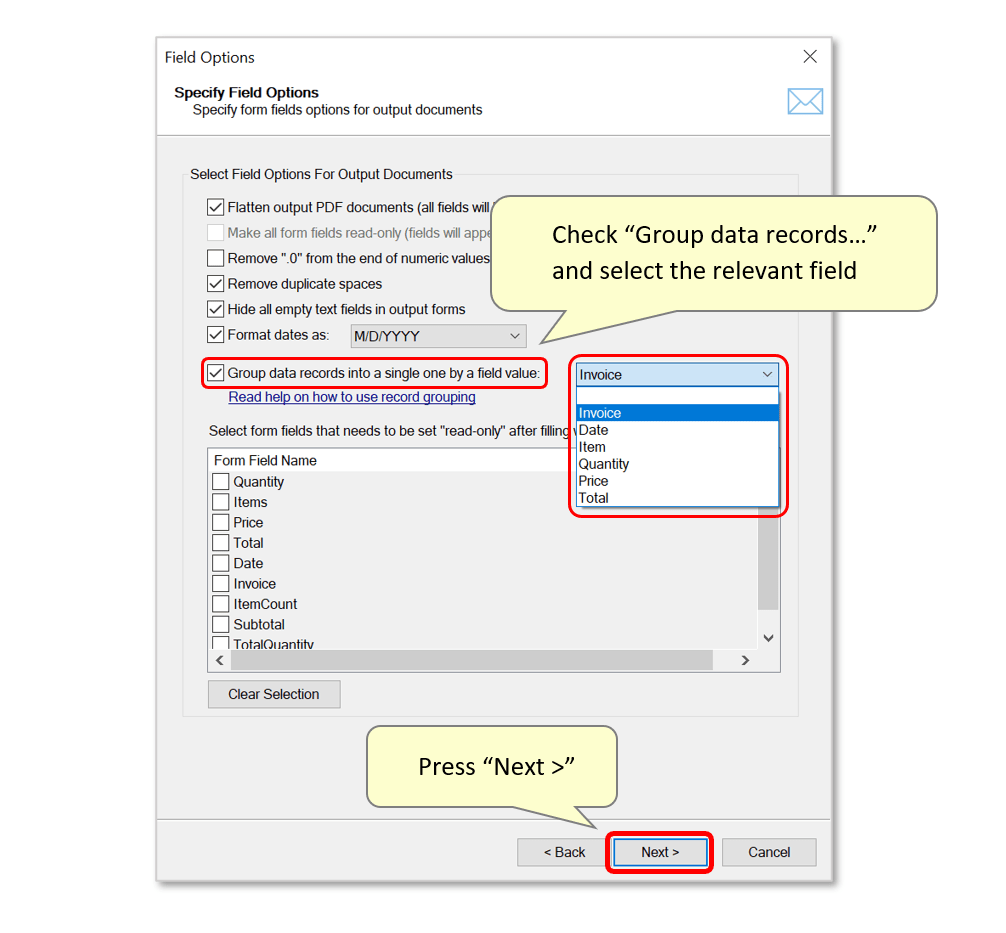
- Check the "Group data records..." option to enable record grouping. Then select the "key" field name from the drop-down list - in this example, it's "Invoice".
- Press "Next >" to proceed.
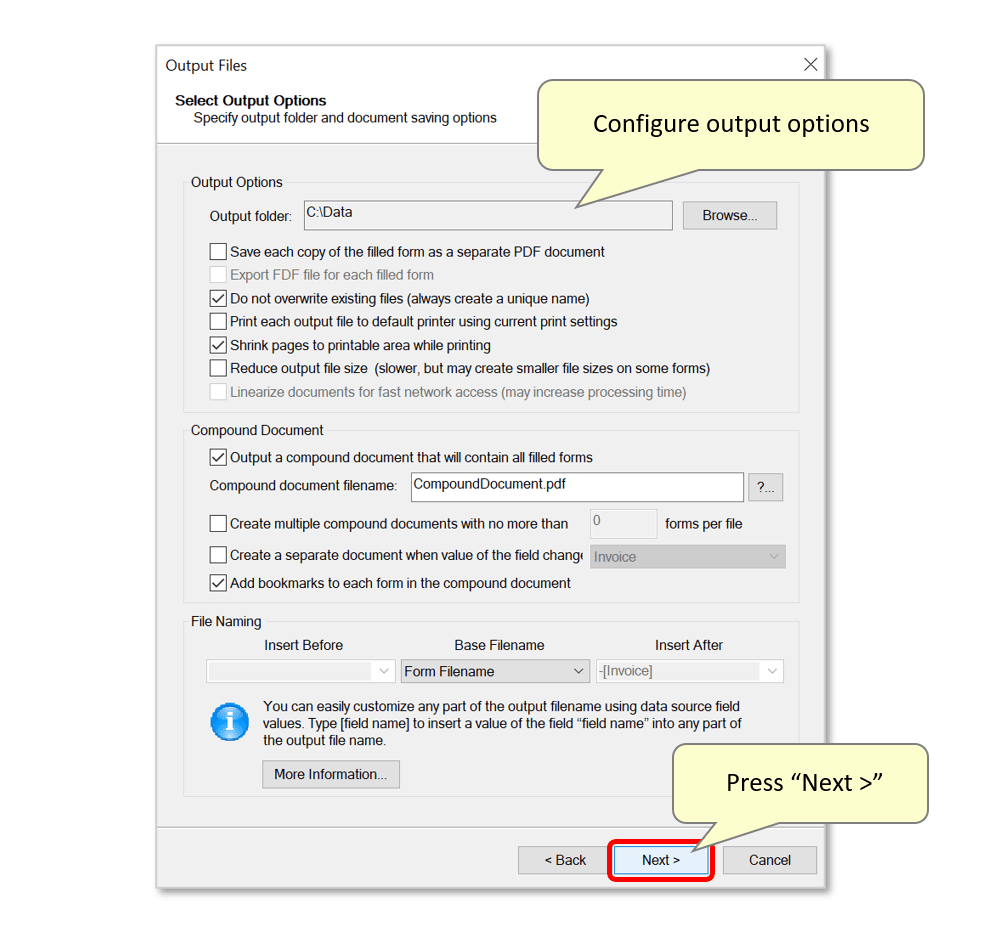
- Step 7 - Specify Output Options
- Use this screen to configure output options. Here we will produce a 'compound document' containing both filled output forms, saved in the "C:\Data" folder.
- Press "Next >" repeatedly to proceed past the remaining settings screens and finish the configuration.
- Step 8 - Complete the Mail Merge
- Review the settings summary and press "OK" to confirm the procedure.

- Press "Run Mail Merge".
- Step 9 - Inspect the Results
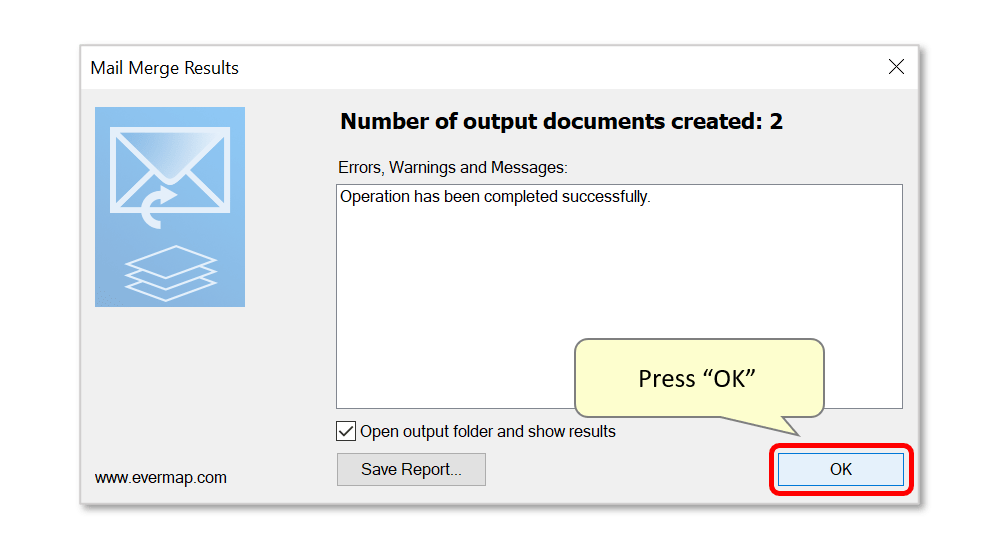
- A results box reports the success of the operation. By default, pressing "OK" opens the output folder/file.
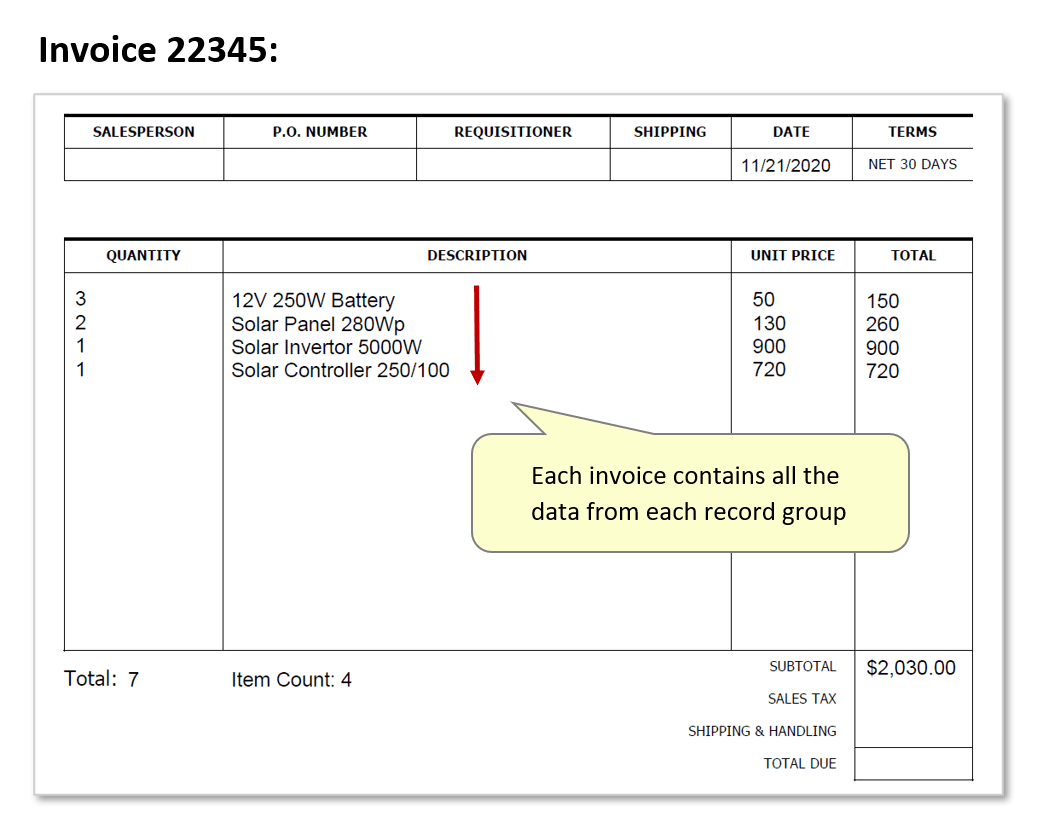
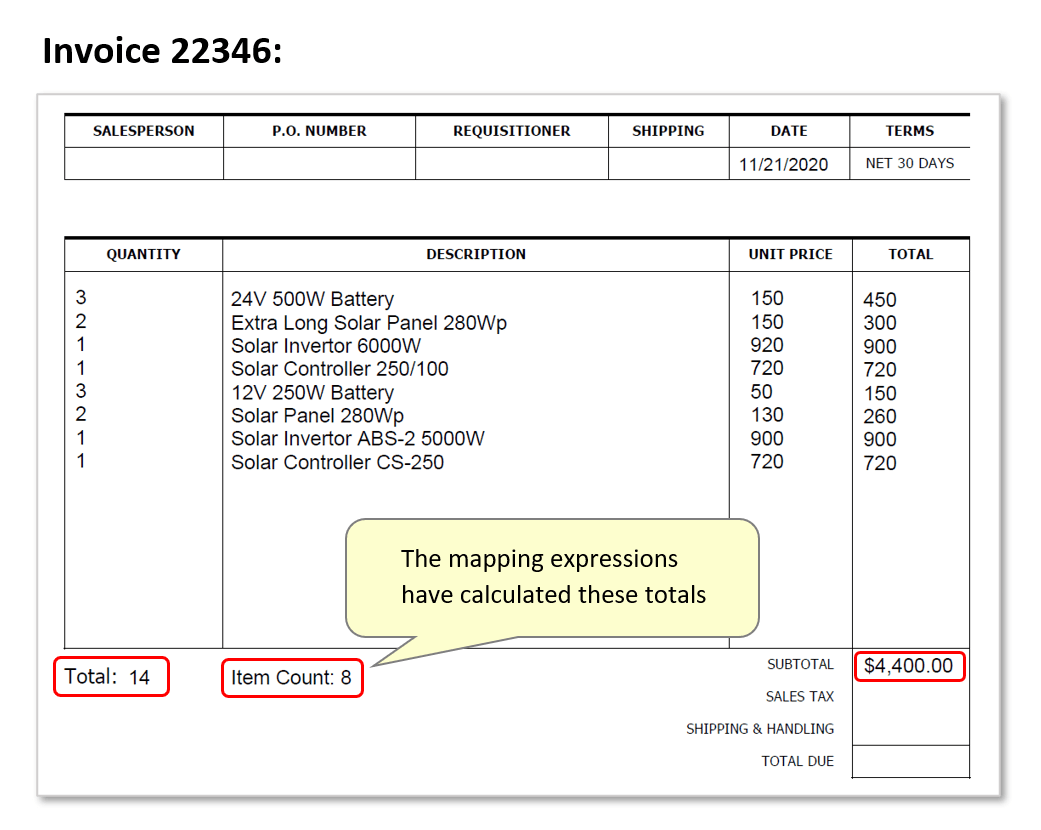
- The data from each corresponding record group has been used to create each invoice. Records have been listed, and the mapping expressions have computed the desired form field content.
- Listing Only Specific Records in the Output
- If the “record grouping” option is enabled and you need to access data from the same field but from different records (i.e.: list only specific values from the record group, not all) you have to use a numbered expression method in the field mapping dialog. Use the following syntax to refer to different values from within the same data field:
- [FieldName] – refers to the first value of the “FieldName” field (the first data record within the group).
- [FieldName:1] – refers to the second record.
- [FieldName:2] – refers to the third record, etc.
- If there is no value associated with a field/record combination, then it is replaced with an empty string. For example, if there are only 4 records in the group (using the data file from above), then using these expressions below would produce the following results (for the first group/invoice “22345”):
- [Item] -> “12V 250W Battery”
- [Item:1] -> “Solar Panel 280Wp”
- [Item:2] -> “Solar Inverter 5000W”
- [Item:3] -> “Solar Controller 250/100”
- [Item:4] -> an empty string
- It may be more convenient to list all values of the specific field (using [FieldName:] syntax) without explicitly listing all possible record numbers, as shown in the tutorial steps above.
- Click here for a list of all step-by-step tutorials available.