Securing PDF Files With Automatically Generated Unique Passwords
AutoMassSecure™ plug-in for Adobe® Acrobat®
- Introduction
- Manually securing PDF files requires multiple steps and takes considerable amount of time. It is not practical when multiple PDF documents need to be secured. The AutoMassSecure™ plug-in for Adobe® Acrobat® is designed to automatically secure a set of PDF files either by generating random individual passwords or by extracting passwords from the document text. The following tutorial is going to illustrate how to password protect multiple PDF documents using random passwords generation. The AutoMassSecure™ plug-in supports several different methods for generating random passwords with different strength.
- Input Documents Description
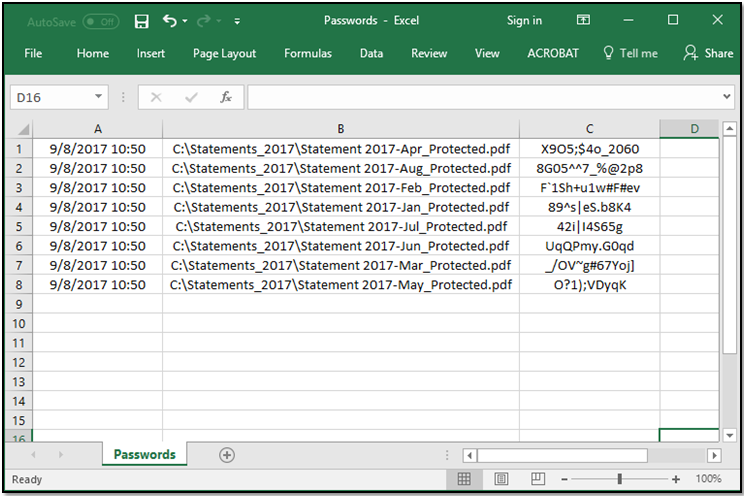
- The input folder used in this tutorial contains 8 PDF files (monthly statements). The goal is to secure each PDF file with a randomly generated passwords.
- Securing Approach
- The AutoMassSecure™ plug-in takes a folder or a set of selected PDF files as input. Every document is secured with randomly generated password with user-selected properties and security strength. Use this method when a maximum protection is required and passwords need to be hard to guess.
- Prerequisites
- You need a copy of Adobe Acrobat Standard or Professional along with AutoMassSecure™ plug-in installed on your computer in order to use this tutorial. You can download trial versions of both Adobe Acrobat and AutoMassSecure™.
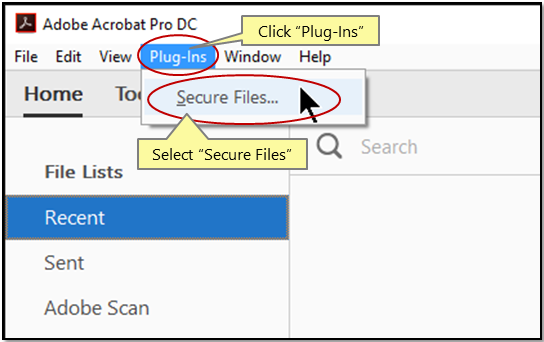
- Step 1 - Open “AutoMassSecure Plug-in Settings” Menu
- Select “Plug-Ins > Secure Files...” from the main menu.
- [⚡ How to locate Plugins menu in Adobe® Acrobat® ⚡]
- Step 2 - Specify General Output Settings
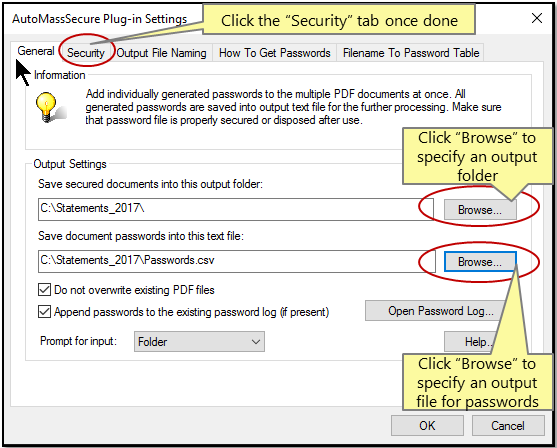
- Specify an output folder for storing secured files via the "Browse..." button. Press the second “Browse...” button to specify an output file that would contain generated passwords. Click the “Security” tab once done.
- Step 3 - Specify Security Settings
- Optionally, specify document security settings in this tab. Selected access restrictions will be applied to each processed document. Click the “Output File Naming” tab once done.
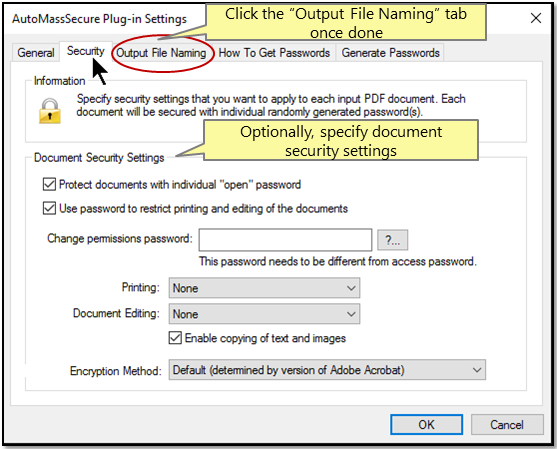
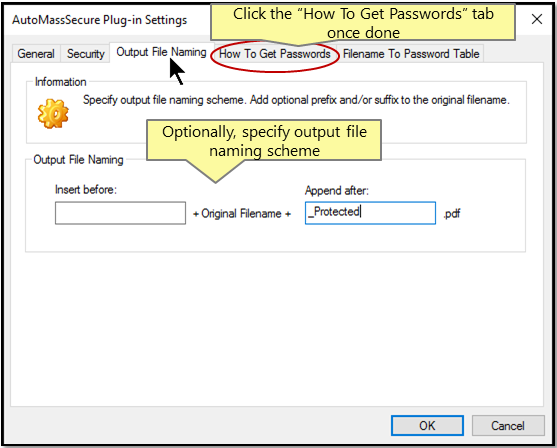
- Step 4 - Specify Output File Naming
- Optionally, specify output file naming scheme for secured files by adding prefix and/or suffix to the original file name. Click the “How to Get Passwords” tab once done.
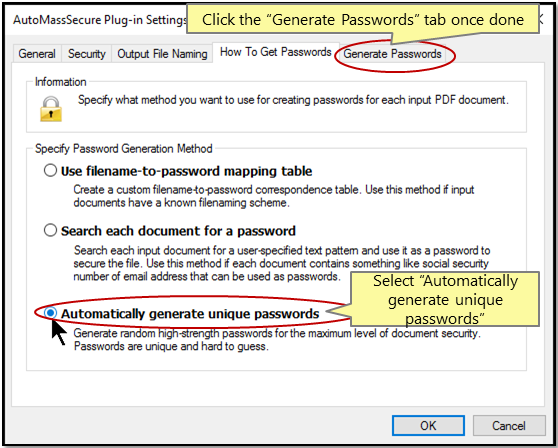
- Step 5 - Specify Password Generation Method
- Select “Automatically generate unique passwords” method. Click the “Generate Passwords” tab once done.
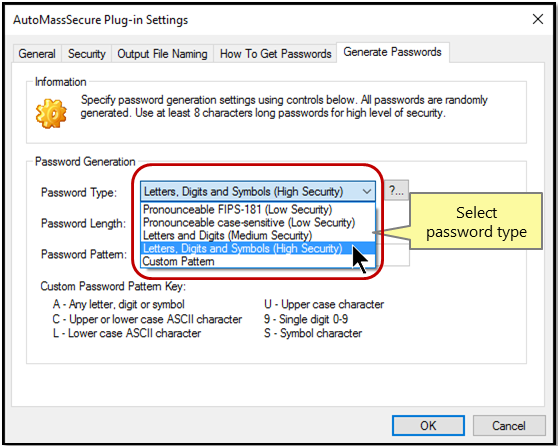
- Step 6 - Select Password Type
- The plug-in supports 5 different password types:
- 1. Pronouncable passwords (FIPS-181 Standard). Passwords generated by this method are easy to remember, but provide low security protection. Examples: etujkoka, irfvedmy, obgrevrawmu, addkiyou.
- 2. Pronouncable case-sensitive passwords. This method uses FIPS-181 algorithm but also randomizes case of individual characters. These passwords are harder to remember than FIPS-181 and provide low-to-medium security protection. Examples: OaHidleINY, UKtroLziiCa, OaCdIsGeJ.
- 3. Variable length passwords that contain only ASCII characters (both lower and upper case) and digits This method randomly generates case-sensitive passwords by mixing English characters with digits (0-9). These passwords are hard to remember and provide medium-to-high level of security protection. Examples: pO6SYER866su0A, 6Ax4TROvHSm, xiQE72EPfsok.
- 4. Variable length passwords that contain ASCII characters (both lower and upper case), digits (0 - 9) and symbols. This method randomly generates case-sensitive passwords by mixing English characters with digits (0-9) and symbols (symbols used: ~`!@#$%^&*()-_=+[{]}\|;:',<.>/? ). These passwords are very hard to remember and provide high level of security protection against automated password-breaking techniques. Examples: P8iEmD=/7zfjt?, 9A4eh3Q}p9n6, E5jRQ!wMBDsd*0.
- 5. Passwords based on custom user-specified pattern. Password pattern defines what character type can appear in the specific position. This method randomly selects a password length from a user specified range and repeats the password pattern to create a password of the necessary length. This method provides great flexibility in generating wide variety of passwords to satisfy custom security requirements.
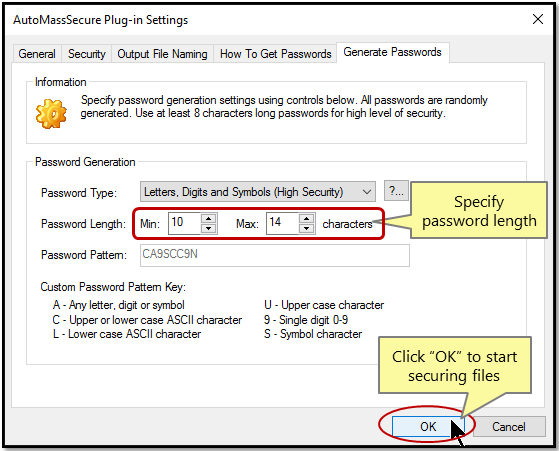
- Step 7 - Specify Password Length
- Specify required min/max password length (5 - 64 characters). If you have selected the "Custom pattern" type, then enter the desired password pattern using pattern keywords (shown on screen).
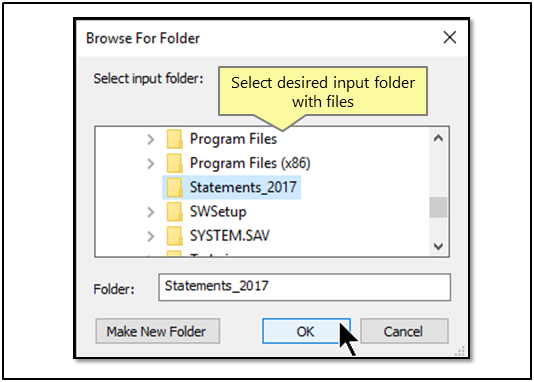
- Step 8 - Specify Input Folder
- Select an input folder with PDF documents that need to be secured. Click "OK" once done.
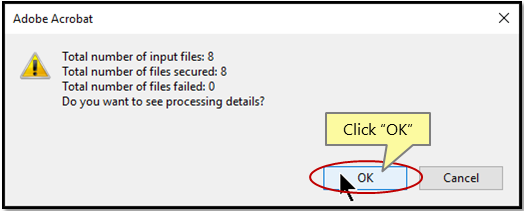
- Step 9 - Inspect the Results
- The resulting dialog contains information about the total number of input files, secured files, and failed files. Click "OK" to open the processing log.
- The processing log contains detailed information about input/output files, password-protection method used, and a processing date.
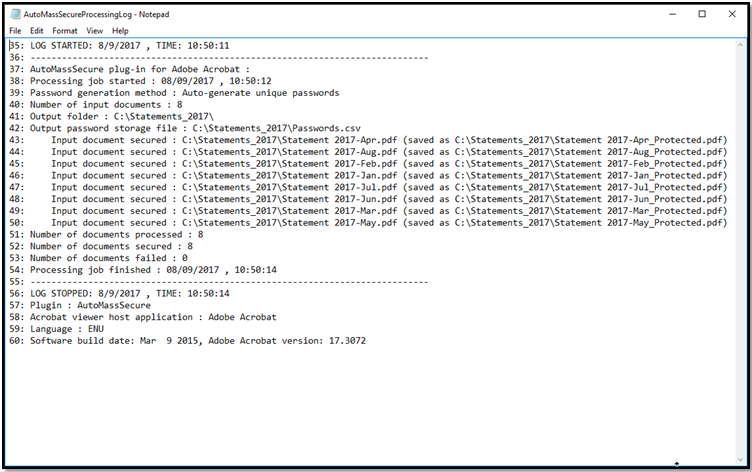
- Processing information such as time stamp, output filename and associated access passwords are saved into a special "password file" for further processing by external applications. The plug-in allows storing this metadata in either CSV or Excel-compatible XML file format.