Merging PDF Files From Multiple Folders Into Multiple PDF Files
AutoSplit plug-in for Adobe® Acrobat®
- Introduction
- The AutoSplit pug-in for Adobe Acrobat provides a way to merge PDF files from multiple folders into multiple output PDF documents based on filename similarity. Each output PDF document is created by taking exactly one file from each input folder and merging them together into a single PDF. Files are merged based on file names.
- Sample Documents Description
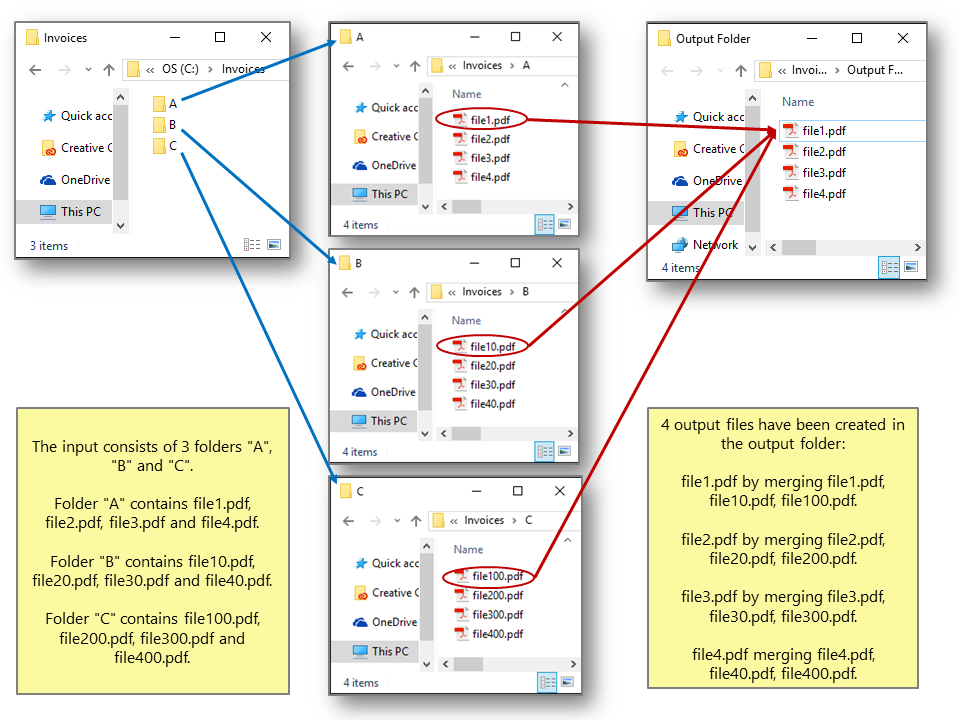
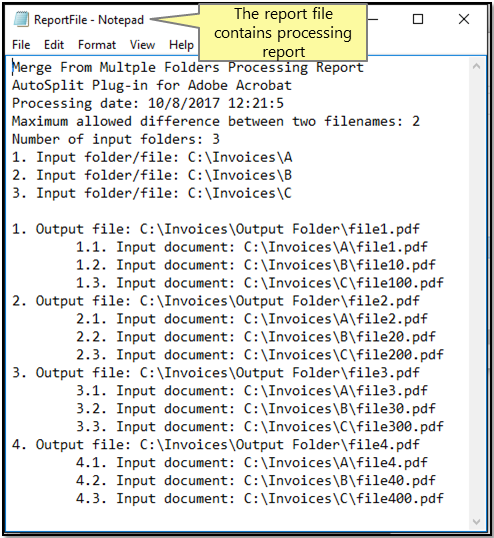
- The input PDF documents that we are going to use in this tutorial are located in 3 folders: "A", "B" and "C".
- Folder "A" contains file1.pdf, file2.pdf, file3.pdf and file4.pdf.
- Folder "B" contains file10.pdf, file20.pdf, file30.pdf and file40.pdf.
- Folder "C" contains file100.pdf, file200.pdf, file300.pdf and file400.pdf.
- The goal is to create 4 output files by merging input files based on name similarity:
-
- file1.pdf by merging file1.pdf, file10.pdf, file100.pdf;
- file2.pdf by merging file2.pdf, file20.pdf, file200.pdf;
- file3.pdf by merging file3.pdf, file30.pdf, file300.pdf;
- file4.pdf by merging file4.pdf, file40.pdf, file400.pdf.
- Merging Approach
- Unlike regular document merging, there are multiple output files from this operation. Each output file is created by taking one file from each input folder and merging them together. Files are merged based on file names. For each file in the first input folder, there is one output file (with the same name) created in the output folder. Documents are combined by searching for the most similar file names in each input folder and appending them to the output file. Each file name is compared to the name of the current output file and the file name with the longest match is used. This method can be used to assemble multiple personalized documents (for example, montly statements) from multiple sub-documents. The user can control the minimim required similarity between file names.
- Batch Processing Support
- This operation is supported by Acrobat's batch processing framework (Action Wizard) and can be used alone or inside another batch sequences allowing you to incorporate a splitting and merging operations into document workflows.
- Prerequisites
- You need a copy of Adobe Acrobat Standard or Professional along with AutoSplit™ plug-in installed on your computer in order to use this tutorial. You can download trial versions of both Adobe Acrobat and AutoSplit™.
Step-by-Step Tutorial
- Step 1 - Open “Merge Documents From Multiple Folders” Menu
- Select “Plug-ins > Merge Documents > Merge Documents From Multiple Folders” from the main menu.
- [⚡ How to locate Plugins menu in Adobe® Acrobat® ⚡]
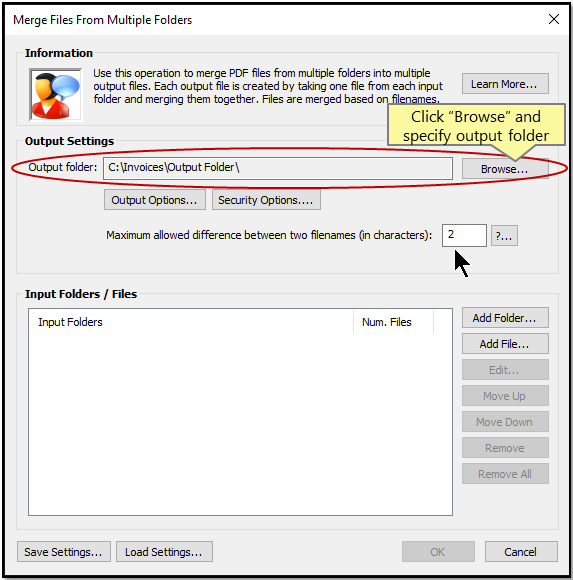
- Step 2 - Specify an Output Folder
- Specify an output folder via "Browse..." button.
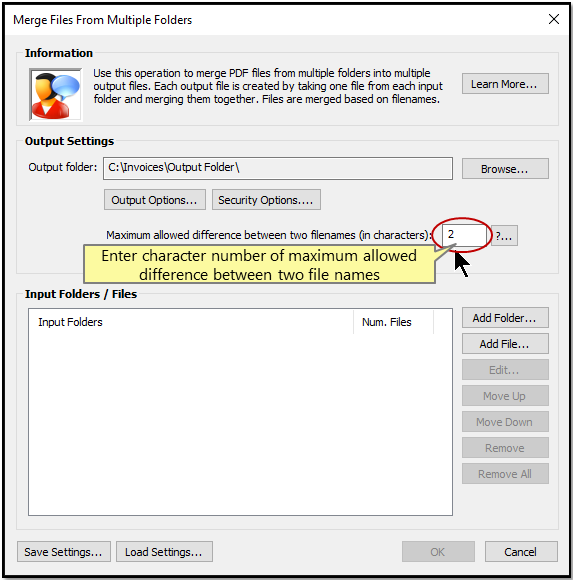
- Step 3 - Set Filename Similarity
- Enter maximum allowed difference between two file names (in characters).
- This parameter limits merging only to those files that differ at most by the given number of characters. The lower this parameter – the more similar file names should be in order to be combined together. The value of 0 requires an exact match between two file names. The value of 1 allows only one character difference, and etc.
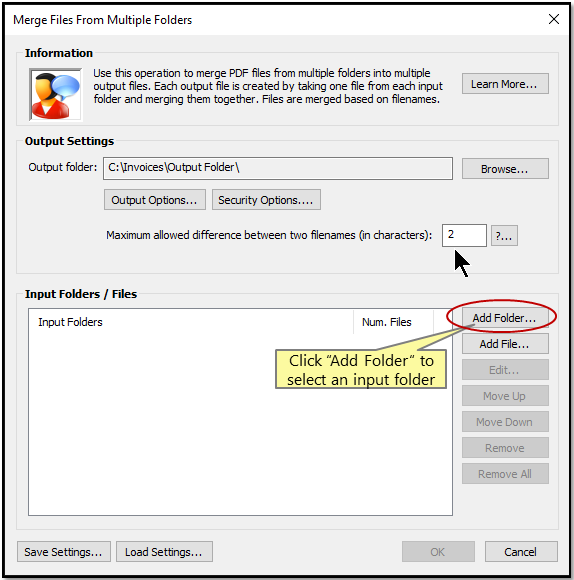
- Step 4 - Specify an Input Folder
- Click "Add Folder" to add an input folder to the file merging list.
- It is possible to use regular files (PDF or any file that can be converted to a PDF by Adobe Acrobat) as input instead of the folder. Files are simply inserted into each output file according to their position in the input list.
- Select an input folder.
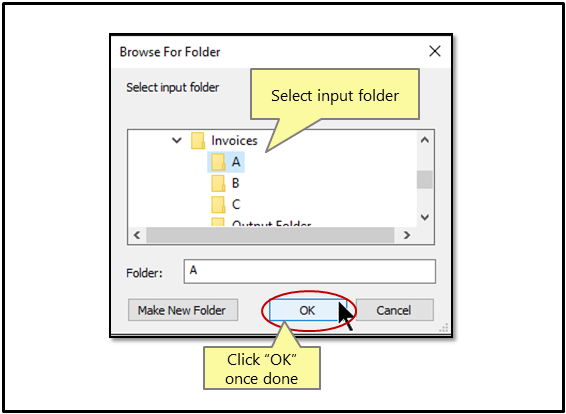
- Click "OK” once done.
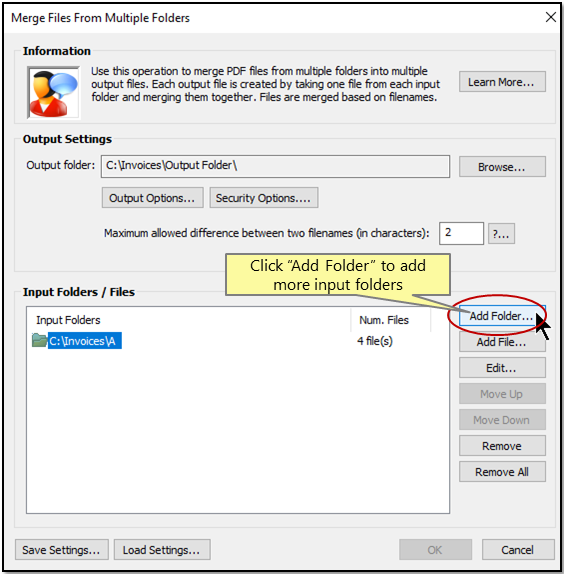
- Step 5 - Add More Input Folders
- Selected folders or files appear in the "Input Folders/Files" list.
- Click “Add Folder” button to add more input folders as necessary.
- In this tutorial, we are going to add two more folders - "B" and "C".
- Step 6 - Start Merging Process
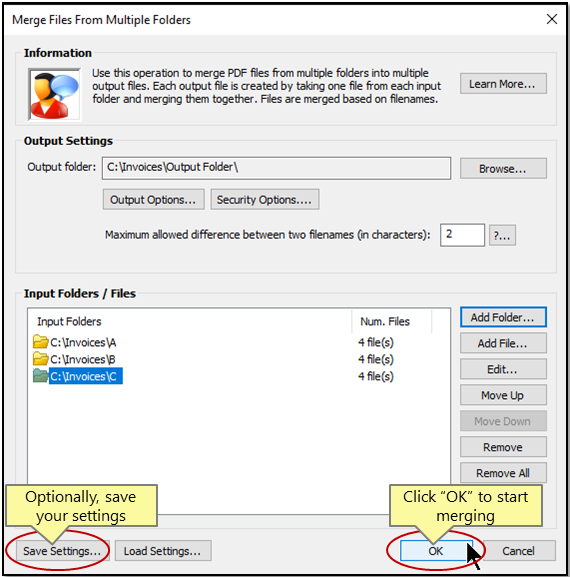
- We have added 3 folders "A", "B" and "C" as input to the merging process. The "Input Folders/Files" list shows selected folders and display a corresponding number of files in each folder. Press "Save Settings..." button to save currently selected input folders and processing parameters into a settings file for future reuse. You can load settings from a settings file by pressing the "Load Settings..." button.
- Click “OK" to start merging process.
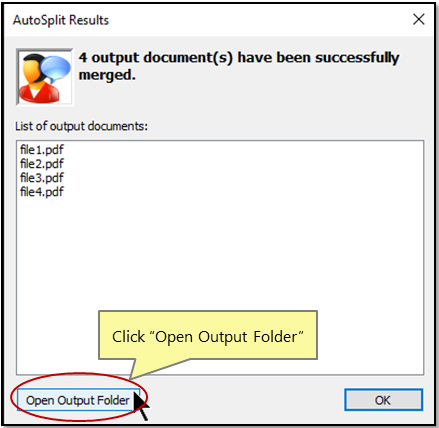
- Step 7 - Examine the Results
- The “AutoSplit Results” dialog appears on screen once the processing is completed. It shows a list of output documents. Click “Open Output Folder” to inspect the output files.
- Step 8 - Inspect Output Files
- The AutoBookmark™ plug-in has automatically created 4 output files and saved them into output folder selected at step 2.
- - file1.pdf by merging file1.pdf, file10.pdf, file100.pdf
- - file2.pdf by merging file2.pdf, file20.pdf, file200.pdf
- - file3.pdf by merging file3.pdf, file30.pdf, file300.pdf
- - file4.pdf merging file4.pdf, file40.pdf, file400.pdf
- The software automatically created "Merge From Multiple Folders Processing Report.txt" file and "Merge Documents From Multiple Folders Cover Page".PDF files. The processing report lists input files used to create each output files as well as shows input folders and similiarity parameter used.
- Click here for a list of all step-by-step tutorials available.